When a website visitor requests live chat, you answer it from the Inbox or from the Chatlogs panel. You can also start a live chat yourself with a visitor who is on your site right now. This article covers how to find and answer live chats, when a live chat ends, how to receive notifications, how to set your operator identity, and how to manage per-chatbot notification preferences.
Live chat runs in the chat widget on your website only. Replies are not delivered to WhatsApp, Messenger or Instagram.
Answering live chats in the Inbox
Select your chatbot and open the Inbox tab. When a visitor asks for a person, the live chat appears as a card in the Live now section above the ticket list (above the table in the Table view). Each card shows the visitor's name, the state of the chat, how long it has been running and the visitor's last message. While nobody has answered yet, the state is Waiting for an operator and a bar counts down to the moment the chat counts as missed (Missed in and the time left).
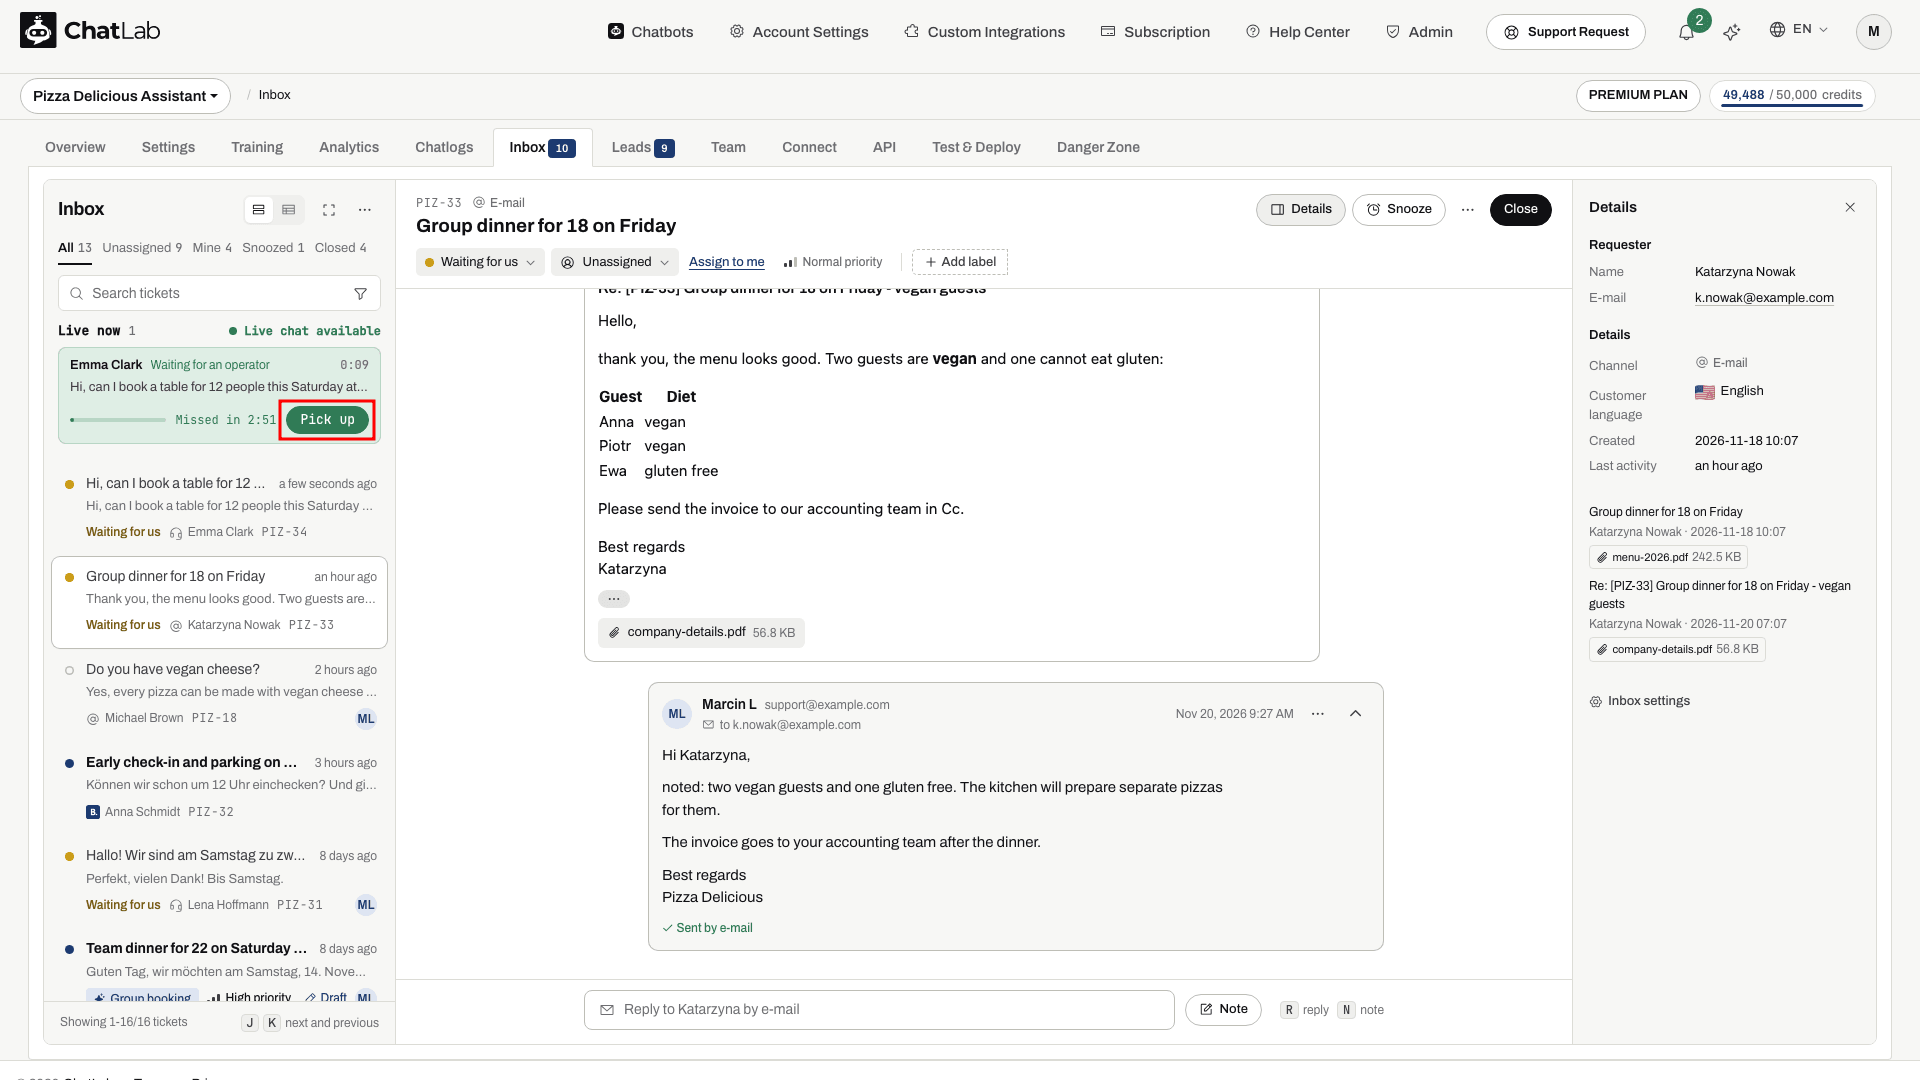
- Click Pick up on the card. This joins the live chat and opens its ticket. Once somebody answers, the card shows With and the operator's name, so your teammates know the chat is taken.
- Type your answer in the reply box of the ticket thread and press
Enterto send it (Shift + Enterstarts a new line). During a live chat the reply box stays open. It goes straight into the visitor's chat window, with your name above it. - Keep the conversation going in the same thread. The visitor's messages appear in the thread as they arrive, and the chatbot stays quiet while the live chat runs.
- When you are done, click End live chat in the ticket header.
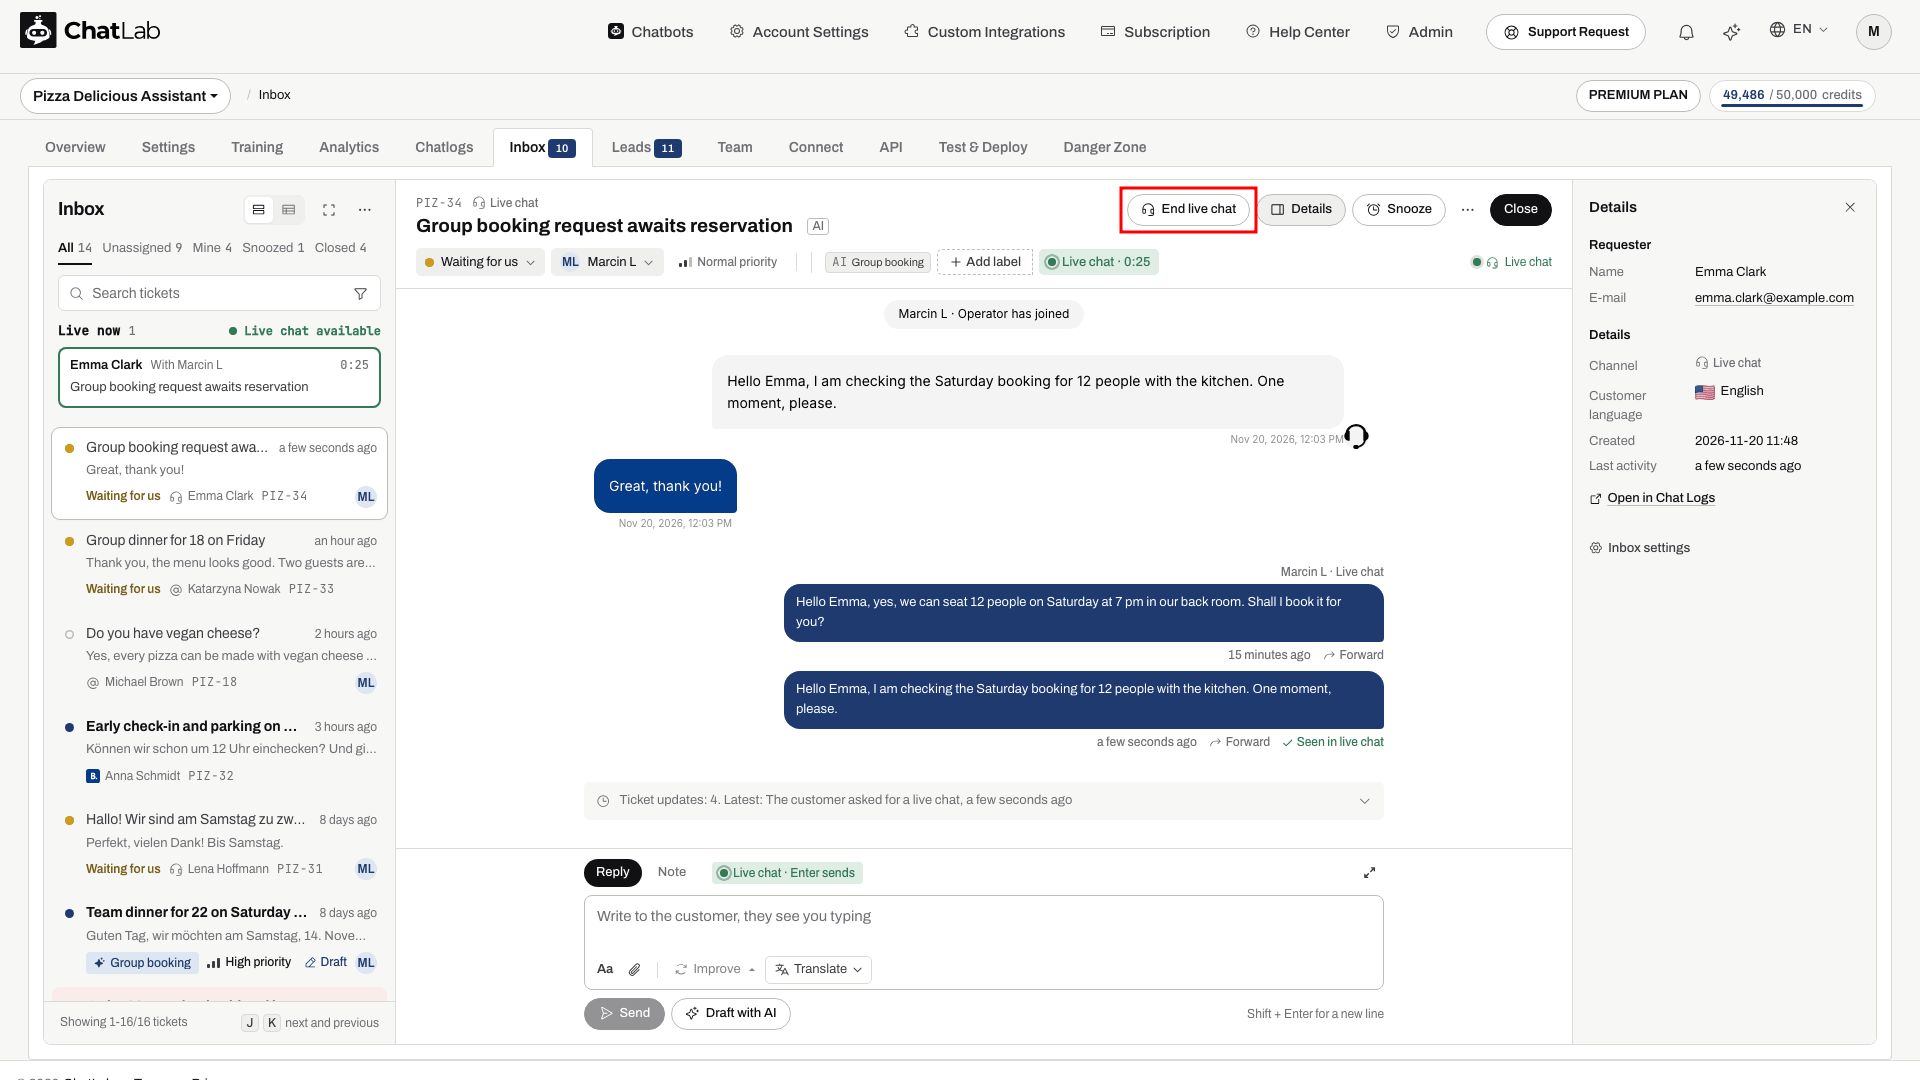
The ticket stays in the Inbox after the chat ends, with the whole exchange in its history, so you can close it or follow up by e-mail later. See Live chats in the Inbox.
Answering live chats in Chatlogs
Live chat conversations also appear alongside regular chatbot conversations in the Chatlogs tab. A visitor may start with the AI chatbot and then request a live operator mid-conversation.
Select your chatbot and click the Chatlogs tab.
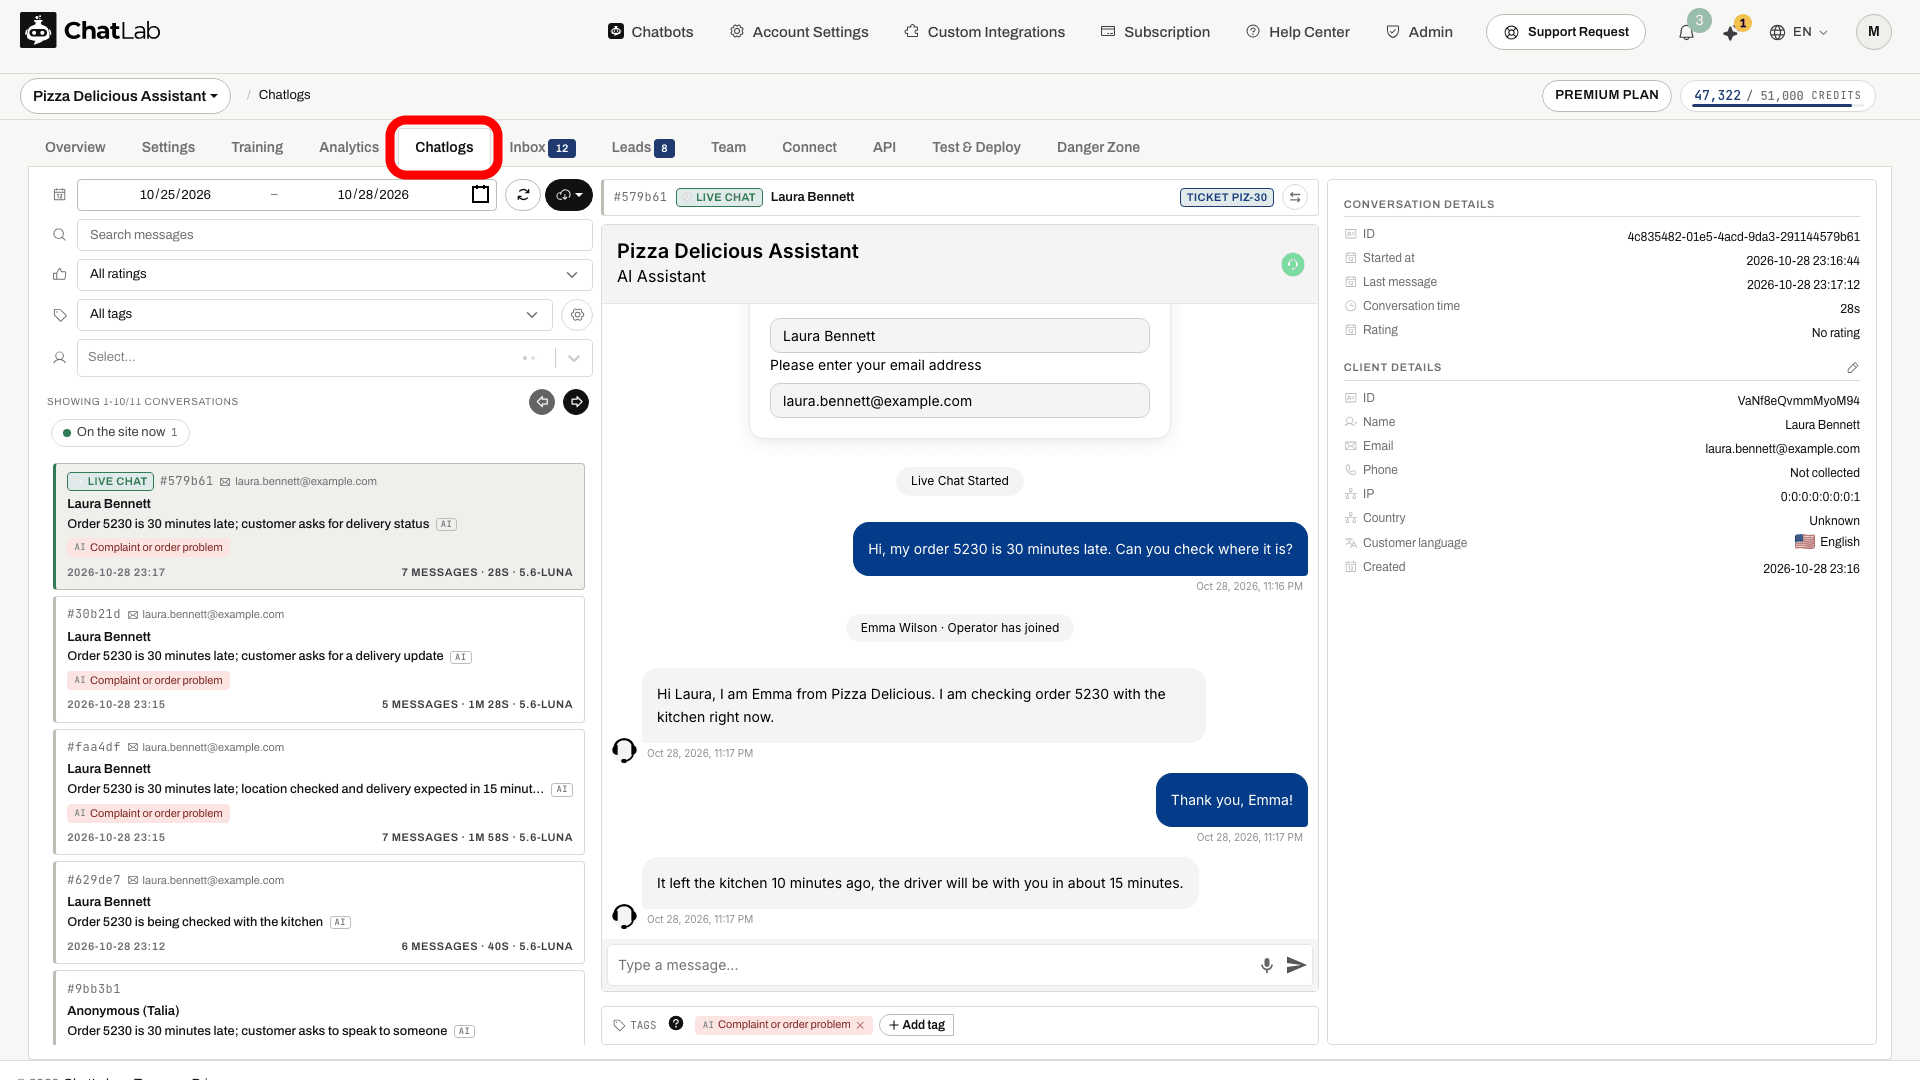
Active conversations waiting for an operator are marked with a blinking live chat icon in the conversation list. Click any active conversation to open it and begin exchanging messages with the visitor in real time.
When a live chat starts, the visitor's details from the pre-chat form - their name and email - are shown in the transcript right at the point the session began, so you can see who you are talking to without leaving the conversation. They stay there when you reopen the conversation later. The Client details panel on the right shows the same information for the visitor as a whole.
While the live chat is active:
- The message input is enabled so you can type and send replies
- A typing indicator shows when the visitor is typing
- You can close the live chat session at any time using the close button in the chat header
Once you close the session, or it ends after 10 minutes without a message from either side, the conversation returns to AI-only mode and the message input is disabled. Every message keeps the live chat open, including replies you send from the Inbox.
Starting a live chat yourself
You can open a live chat with any visitor who is on your site right now, even if they never asked for a person and even when Allow users to contact live chat is switched off in Settings > Live Chat. That switch only controls whether visitors can request a person from the widget.
- Reply from the Inbox - when the visitor has a ticket and is on your site, the ticket header shows Online in the chat widget. Your reply appears in their chat window immediately and opens a live chat.
- Join conversation in Chatlogs - open the conversation; when the line under it says The visitor is on the site now, click Join conversation. This opens a live chat in that conversation and a ticket in the Inbox assigned to you. The gear next to the button leads to your Operator profile and to Notifications.
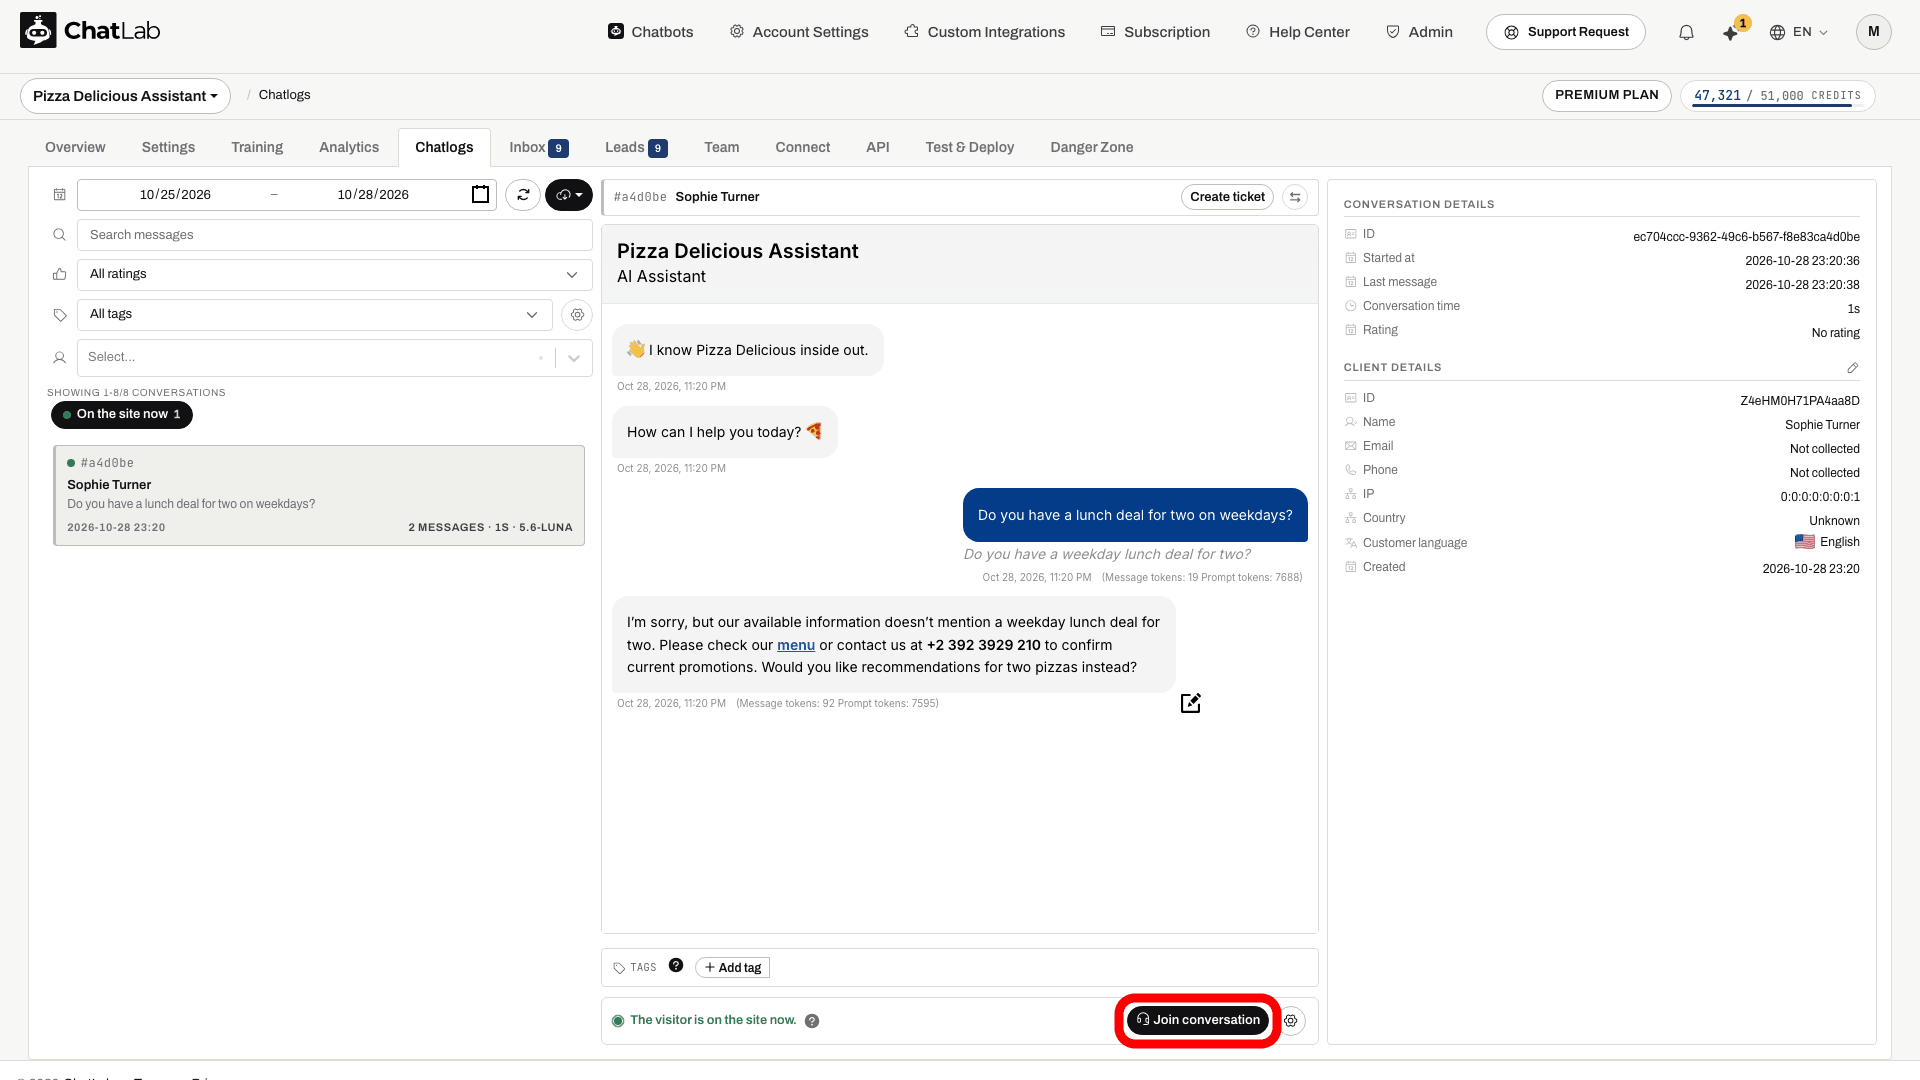
From then on the live chat works the same way as one the visitor requested: the chatbot goes quiet, you answer in the ticket thread or in Chatlogs, and it ends with End live chat or after 10 minutes without a message. If the visitor has already left, the Inbox sends your reply by e-mail instead, or leaves it waiting in their chat window when they left no contact details. See Reply to the customer.
Live chat notifications
When a visitor starts a new live chat or sends a message in an active session, a notification appears on the bell icon in the top-right corner of the dashboard. The badge count shows how many conversations need attention.
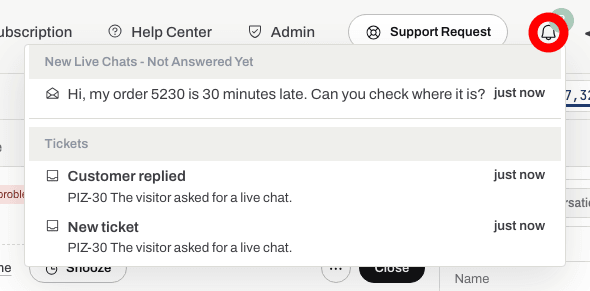
The dropdown groups notifications into up to three categories:
- New Live Chats - Not Answered Yet - sessions where no operator has joined
- Live Chats - New Messages - sessions where the visitor sent a new message
- Tickets - Inbox events such as new tickets, customer replies, assignments and mentions
Click a live chat notification to jump directly to that conversation in the Chatlogs panel, or a ticket notification to open the ticket in the Inbox.
Setting up your operator name and avatar
Go to Account Settings > Operator Profile (in the Inbox and live chat group).
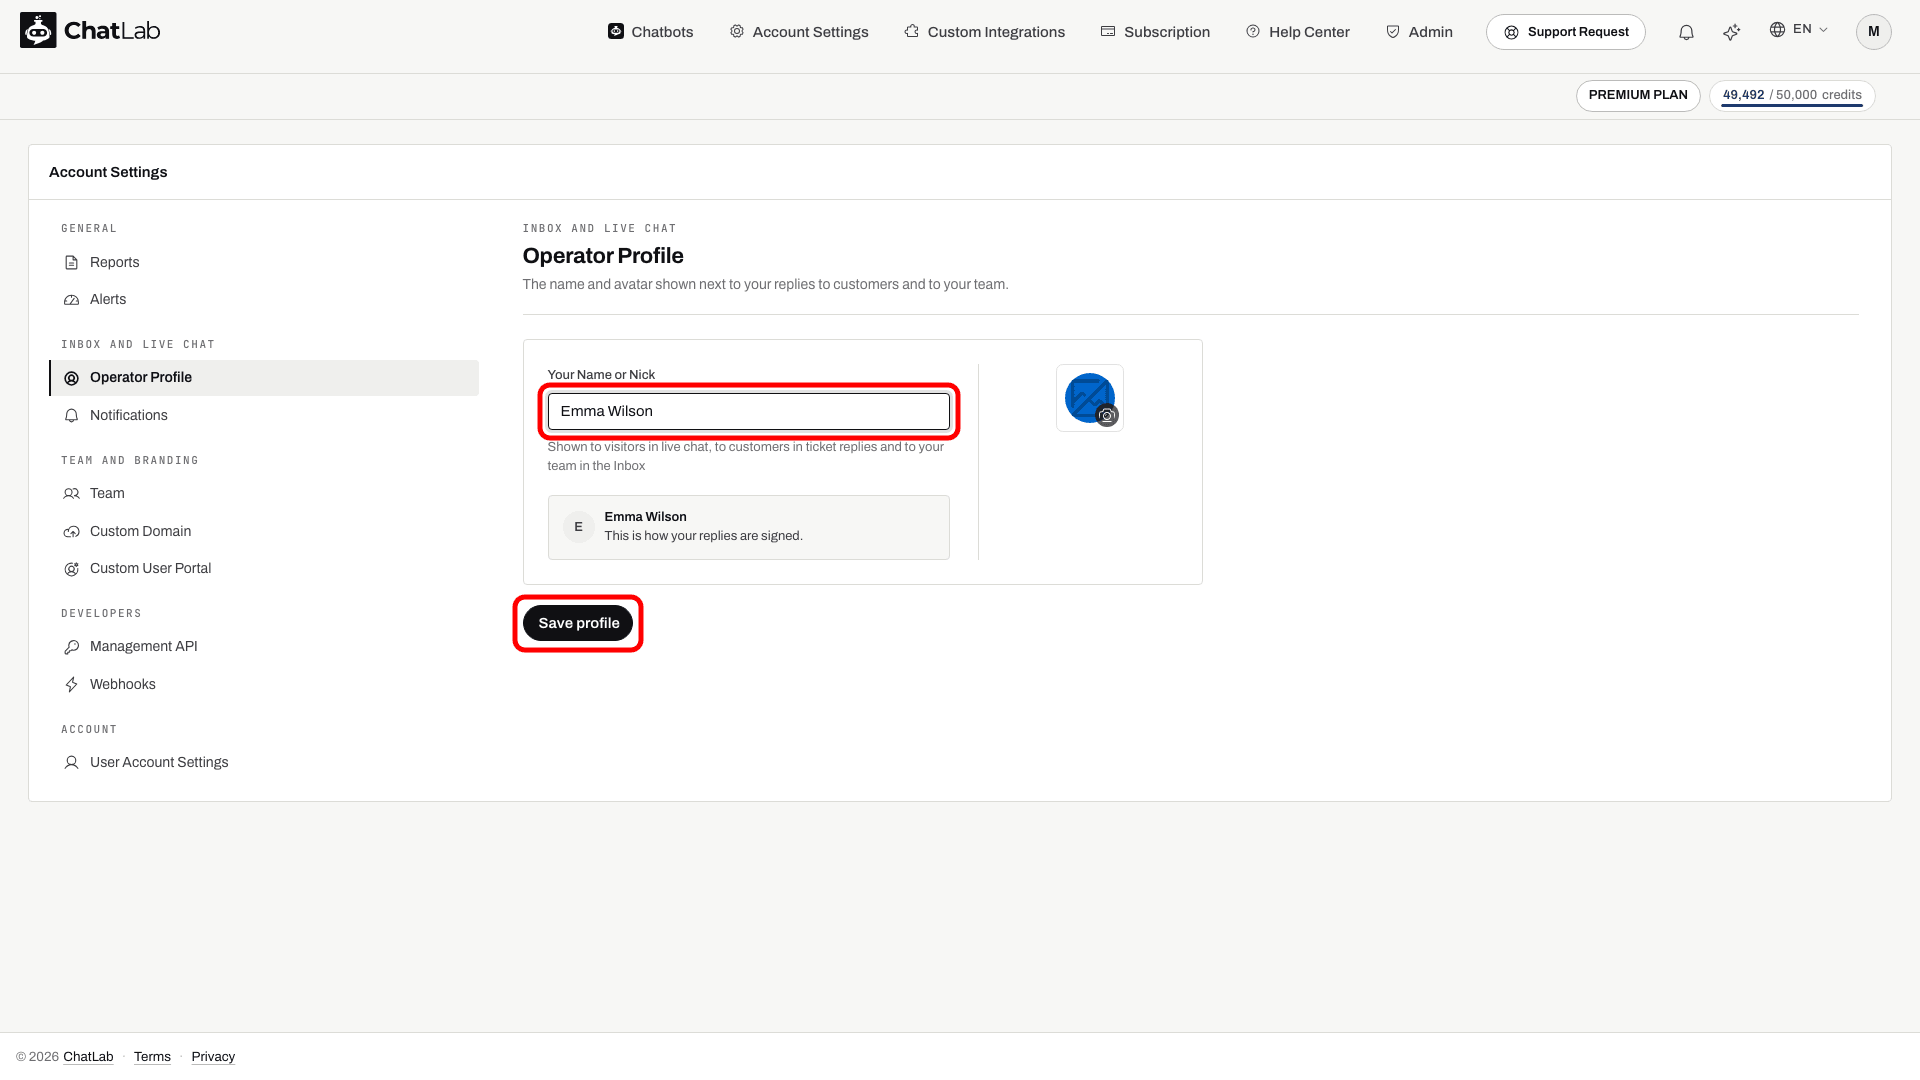
Enter your name or nickname in Your Name or Nick and optionally upload a custom avatar. Your name is shown above each of your messages in the chat widget, so the visitor always knows a person is writing. Your team sees it next to your replies and notes in the Inbox, and in the chatlogs history. Without a name, the first part of your e-mail address is shown instead, in live chat, in Inbox replies and in your e-mail signature. The page shows a preview of how your replies are signed.
A missing avatar uses the default headphones icon. Set your display name separately; omitting an avatar does not replace a saved name.
Click Save profile to save.
Enabling browser notifications
Go to Account Settings > Notifications.
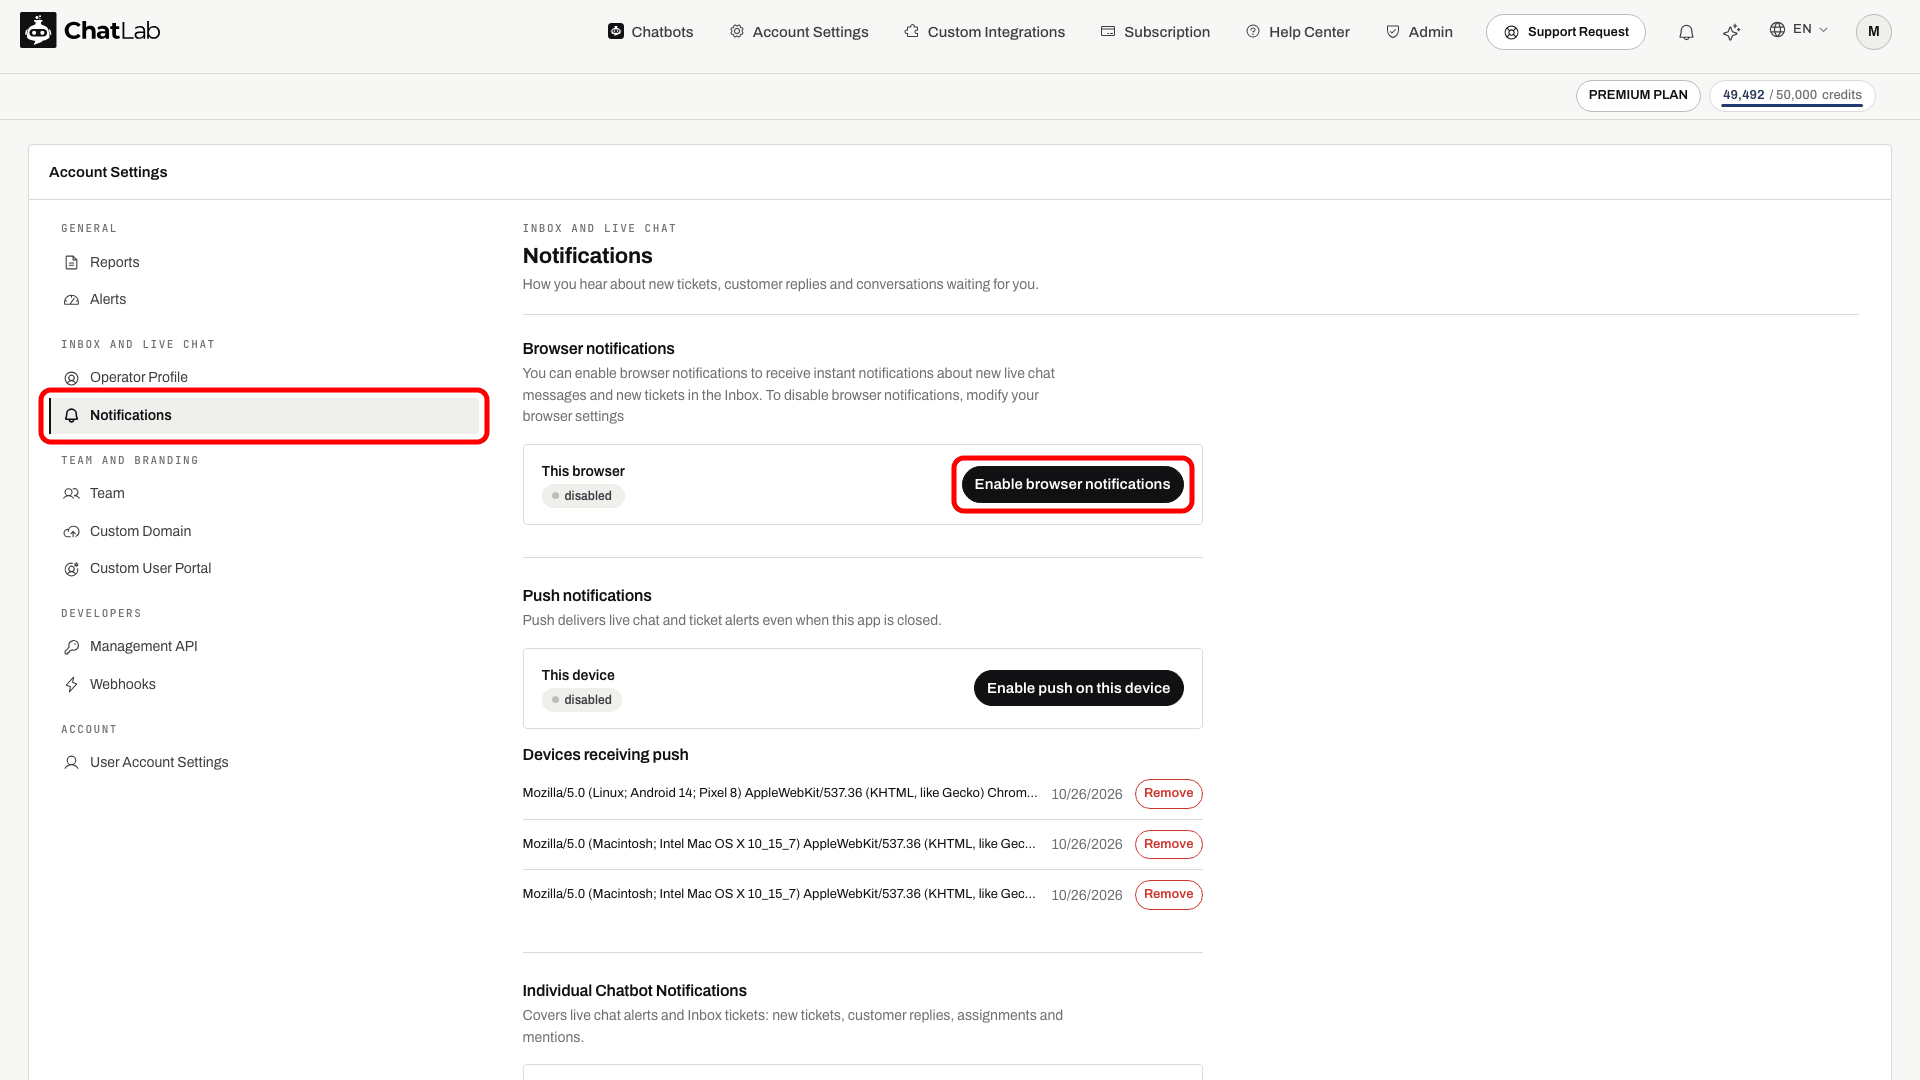
Click Enable browser notifications to receive desktop alerts with sound when a live chat starts or a new message arrives. If your browser shows the notification status as "disabled", click the button to grant permission.
After enabling, you will receive a sound alert and a system notification you can click to jump directly to the ChatLab window.
Delivery depends on browser and operating-system notification permissions. Configure Push notifications on this page if you need alerts when the app tab is closed.
Per-chatbot notification preferences
On the same Account Settings > Notifications page, scroll down to the Individual Chatbot Notifications section. The switch next to each chatbot turns alerts on or off for that chatbot individually and covers both live chats and Inbox tickets. This includes chatbots shared with you by other users.
Click Save notification preferences after making changes.
This is useful when you want to delegate specific chatbots to certain operators. For example, you can disable notifications for chatbots that another team member handles. See Live Chat setup with multiple operators for more details.
Check availability and test
First enable Live Chat on the bot and configure its schedule. If Hide live chat when no operator is available is enabled, operators must keep notifications enabled for that bot and be reachable using the selected presence mode: an open app tab, or an open tab or registered push device. Disabling your bot notifications also removes you from its availability check.
Test with a visitor browser and an operator account: request live chat, pick it up in the Live now section of the Inbox, send a reply and verify it reaches the visitor with your name above it. Click End live chat and check that the bot can respond again. Notification preferences do not assign exclusive ownership of a conversation.
Related articles
- Inbox - the ticket queue with the Live now section
- Live Chat - how to enable live chat, configure the schedule, and customize messages
- Chatlogs - conversation history and Join conversation
- Live Chat setup with multiple operators - configuring notifications for teams
- Human Support Contact Form - the offline fallback when live chat is unavailable