The Inbox turns every request that needs a person into a ticket: e-mails that reach your mailbox, contact form submissions, collected leads, live chats nobody picked up, live chats that are running right now and conversations your team decides to follow up. Each ticket has a code, a status, an assignee and its full history, so a request cannot quietly get lost in somebody's personal mailbox.
The Inbox, AI drafts and the AI text tools are available on every plan, including the free plan. The only part that depends on your plan is the number of mailboxes you can connect.
Where to find the Inbox
Select your chatbot and open the Inbox tab, next to Chatlogs. The number on the tab counts the tickets that need you: new tickets plus tickets waiting for a reply that are assigned to you.
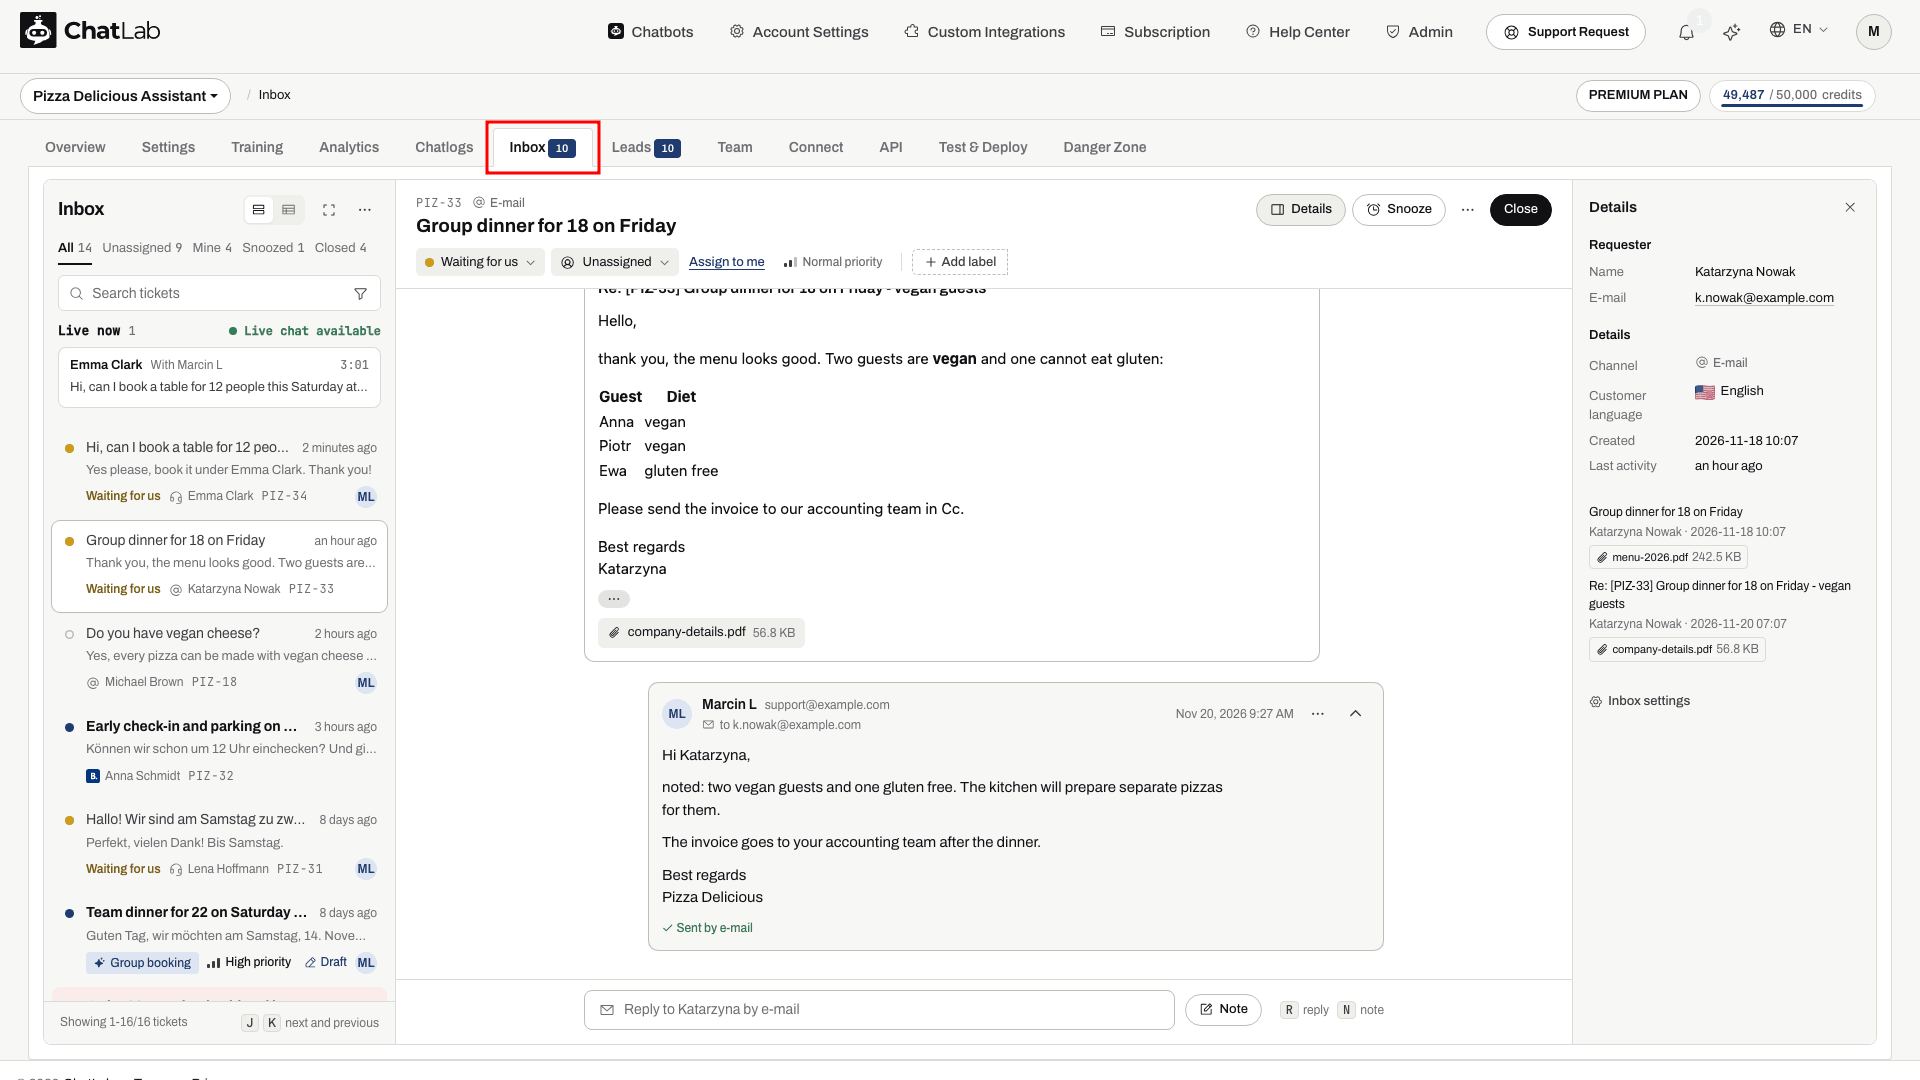
In the default List view the screen has three columns:
- Left - the Inbox heading with its buttons, the views, the search box, running live chats and the ticket list
- Center - the selected ticket: its header, its history and the reply box
- Right - the Details panel: who the customer is, the ticket details (including the Customer language), the e-mails on the ticket, the customer's earlier tickets and your internal notes. Click Details in the ticket header or press
Ito show or hide it.
The buttons next to the Inbox heading switch between List view and Table view (see Table view), hide the menus of the panel (see Hide the menus) and open the ... menu with Refresh and Inbox settings.
Every ticket has a code such as TES-12: a prefix plus a number. The prefix is made of the first letters of your chatbot's name and can be changed in Inbox settings. The code appears in the list, in notifications and in the subject of e-mails you send, so a customer who replies to a ticket e-mail lands on the same ticket.
Where tickets come from
You never create most tickets by hand. A ticket opens automatically when:
- An e-mail arrives in your connected mailbox. See Connect your mailbox.
- A visitor sends the contact form in the chat widget. See Human Support Contact Form. The conversation gets the Wanted a person tag and the ticket the same label. You can switch this off in Settings > Human Contact Form with Create a ticket in the Inbox for every contact form.
- A lead is collected, if the switch described in Open a ticket for every lead is on.
- A live chat is missed - the visitor asked for a person and no operator joined in time.
- A live chat is running - it appears in the Live now section and becomes a ticket of its own. See Live chats in the Inbox.
- A conversation gets a tag that opens tickets, for example Wanted a person or Complaint or order problem. See Conversation tags. When AI adds The chatbot did not know, a ticket opens only if the visitor left an e-mail address or phone number; without them, find the conversation with the tag filter in Chatlogs. A ticket opened only by a thumbs down is closed automatically when the customer changes the rating to a thumbs up, or when AI recognises the conversation as spam or nonsense.
- Your team starts it from Chat Logs - with Create ticket, Join conversation or Write to the visitor. See Start a ticket from Chat Logs.
A ticket that comes from your own test conversation in the admin panel shows a Test badge in its header, so you can tell it apart from real customers. AI tags on test conversations never open tickets by themselves.
One conversation has one ticket. When something new happens in a conversation that already has a ticket, it is added to that ticket, and a closed ticket reopens. For e-mail, a reply in the same e-mail thread, or an e-mail with the ticket code in the subject, always lands on its ticket. A new e-mail from a sender who already has an open ticket is added to that ticket; otherwise it opens a new one. Automatic replies such as out-of-office messages do not open tickets.
Ticket titles. For tickets from the chat widget, ChatLab writes a one-sentence title that summarises the conversation, marked with a small AI label, and updates it as the conversation goes on. Titles are written in the language of your team. A title you type yourself and the subject of an e-mail are never overwritten. AI titles do not use message credits.
Customer language. ChatLab also recognises the language the customer writes in - the one they mostly use, or the new one if they clearly switched. It shows in the ticket details with a flag, in English and in the language's own name (for example Polish · Polski), and the reply box uses it to suggest translating your answer. Detecting it does not use message credits.
Priority and labels for new e-mails. Every new e-mail gets an AI priority (Urgent, High, Normal or Low, with a one-line reason in the thread) and the labels whose description fits it, see Labels. Obvious spam can be closed automatically, see Inbox settings. This does not use message credits either.
Live chats in the Inbox
When a visitor asks for a person, the live chat appears as a card in the Live now section above the ticket list. Each card shows the visitor's name, the state of the chat, how long it has been running and the visitor's last message. While nobody has answered yet, the state is Waiting for an operator and a bar counts down to the moment the chat counts as missed (Missed in and the time left). Pick up joins the chat, and once somebody answers the card shows With and the operator's name. When no chat is running, the section shrinks to one line, No live chats, with the number of visitors on your site right now.
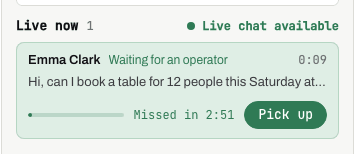
Answering a live chat happens in the ticket thread: what you type goes straight into the visitor's chat window, and End live chat in the ticket header ends it. The step-by-step guide for operators is in Managing incoming live chat conversations, and how to enable and configure live chat is in Live Chat.
Find the ticket you need
Under the Inbox heading are five views, shown as tabs with their own counters:
- All - every open ticket of this chatbot
- Unassigned - open tickets nobody has taken yet
- Mine - open tickets assigned to you
- Snoozed - tickets put aside until a time you chose, see Snooze a ticket
- Closed - tickets that are done
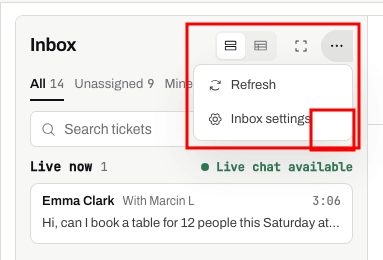
Below the views is the search box, which matches the ticket title and the last message. The funnel button inside the search box shows more filters. The ... button next to the Inbox heading opens a menu with Refresh and Inbox settings (see Inbox settings). Refresh also checks your connected mailbox for new e-mails, so you do not have to wait for the next automatic check.
Every row has three lines:
- A dot for the status, the title and how long ago something happened.
- The last message.
- The labels, the priority, the status, an icon for the channel the ticket came from (envelope for the contact form, @ for e-mail, headset for live chat, card for a lead, pencil for a ticket opened by your team) with the requester, the ticket code, a Draft mark when somebody has an unsent reply draft on that ticket, and the initials of the assignee.
Click the funnel to filter by the date of the last activity, by status, by channel, by assignee, by priority and by label. Clicking a label on any ticket also filters the list to that label. The bottom of the list shows how many tickets you see and moves between pages.
Work with many tickets at once. Point at a row and tick the checkbox that appears; once one row is ticked, every row shows a checkbox. The bar Selected: N above the list lets you Close the selected tickets, Assign to... a teammate, mark them as Spam or Clear the selection.
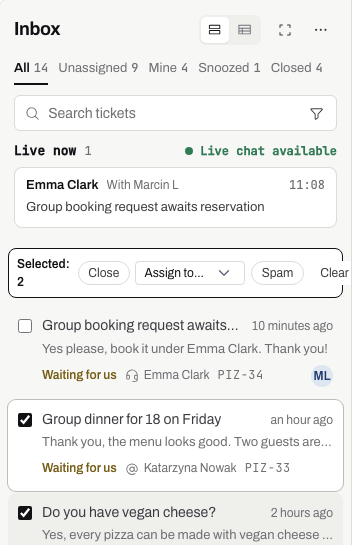
Table view
The switch next to the Inbox heading changes between List view and Table view. The Inbox remembers your choice in this browser.
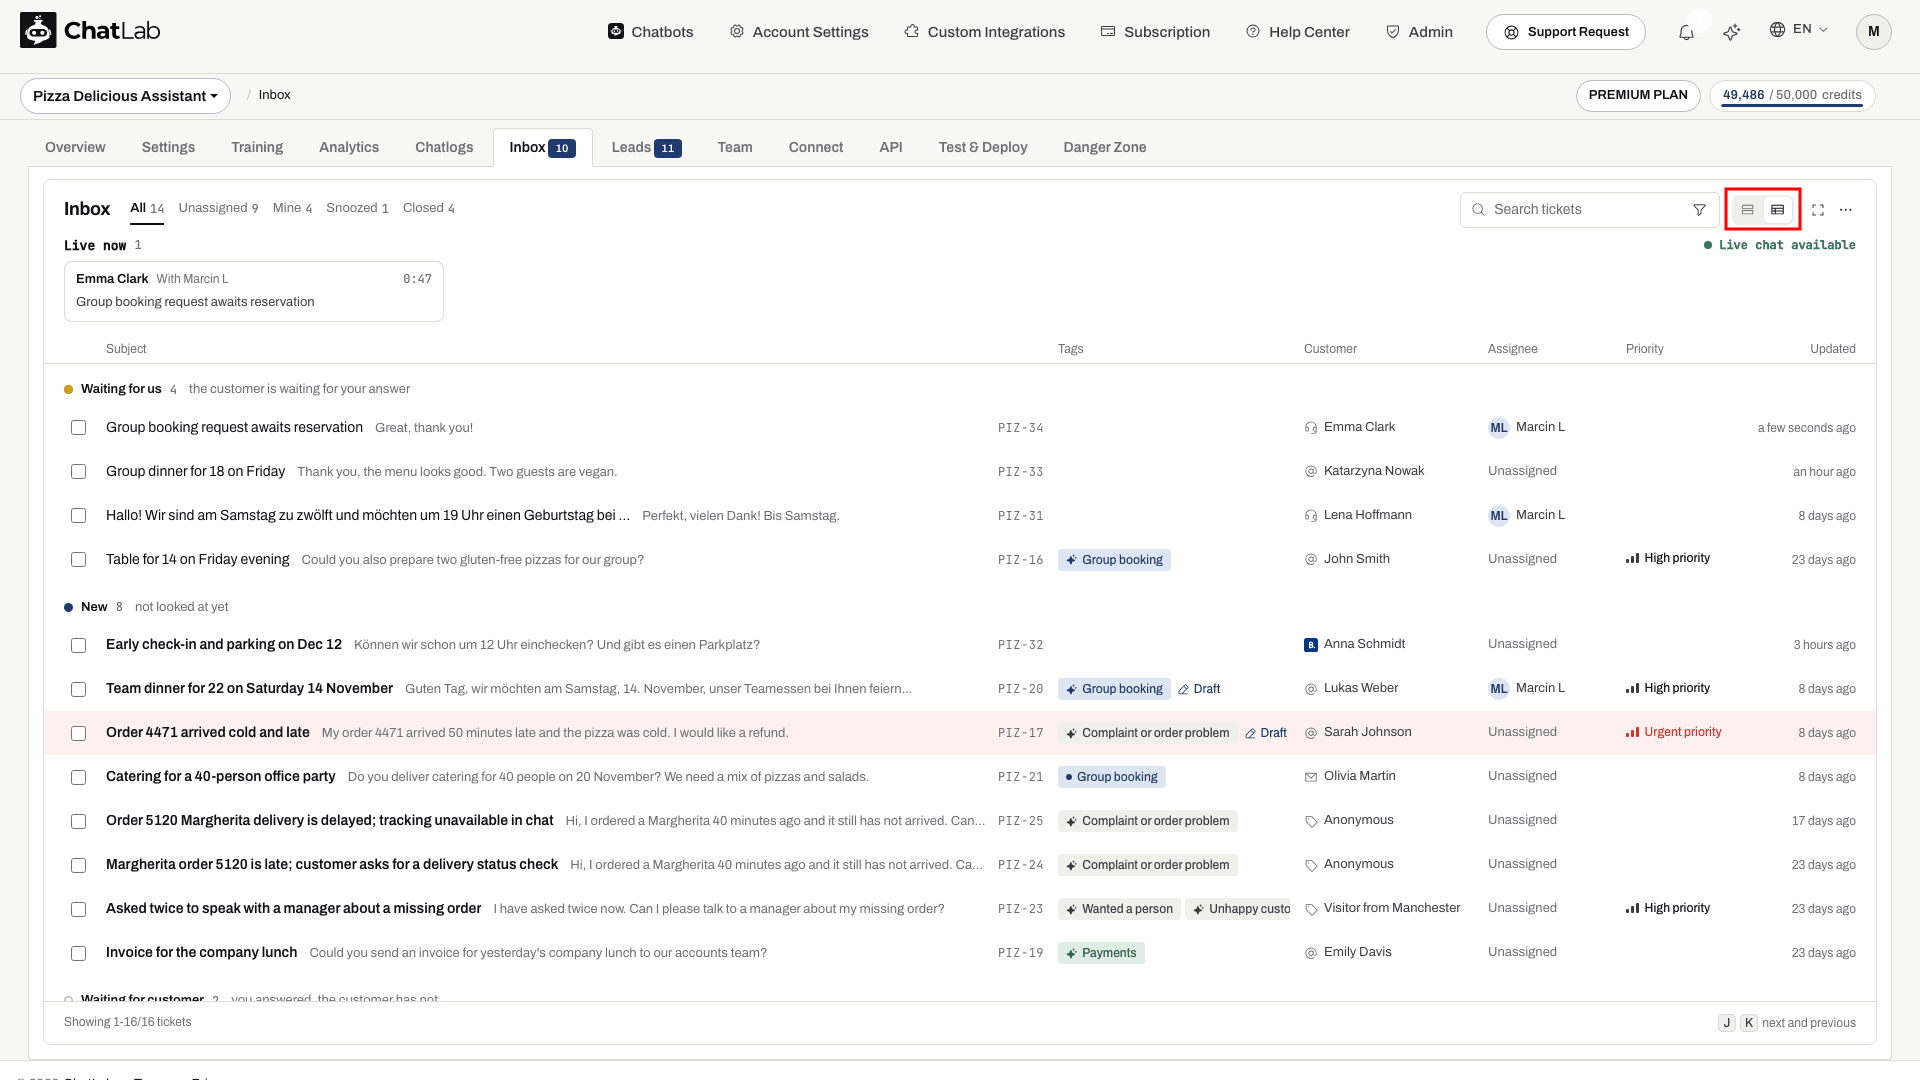
The table uses the full width of the screen and groups the tickets by status: Waiting for us, New, Waiting for customer, Snoozed and Closed. The columns are Subject (with the last message and the ticket code), Tags, Customer, Assignee, Priority and Updated. Running live chats appear as cards above the table.
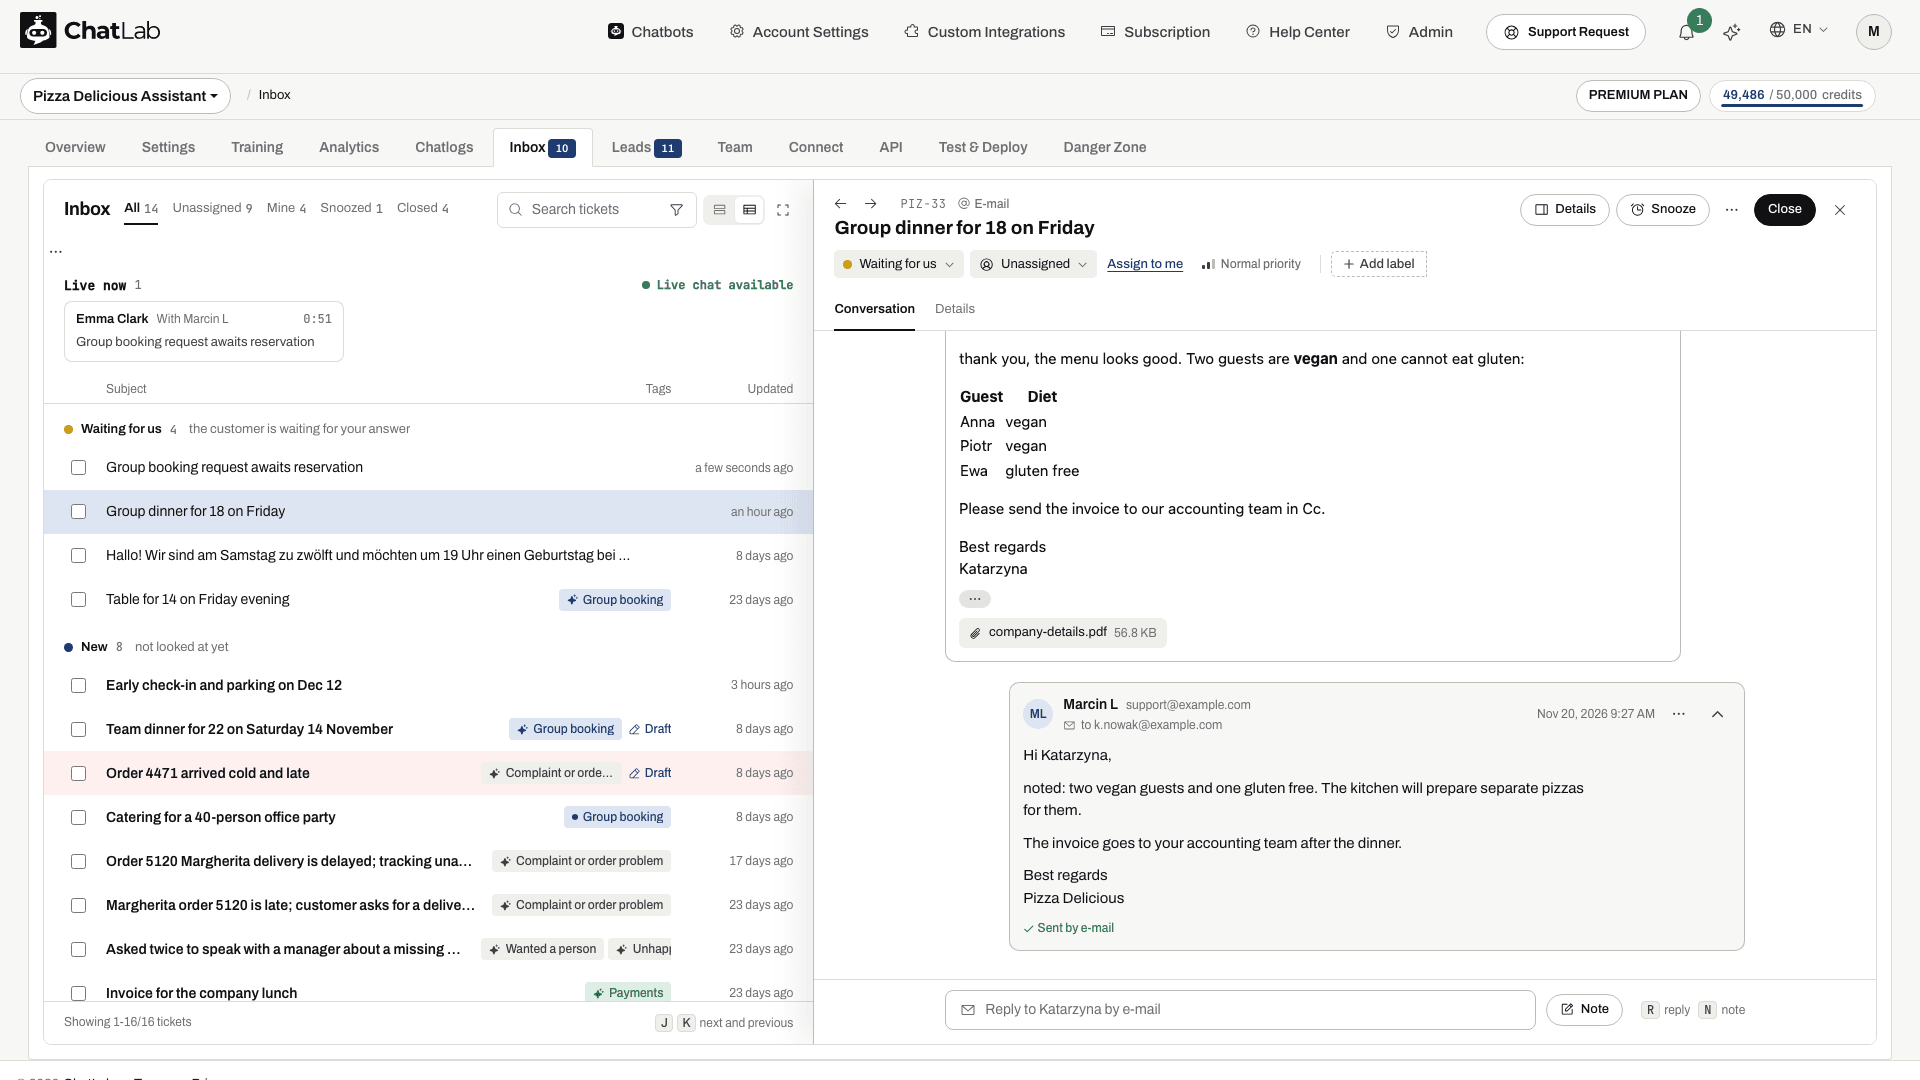
Click a row to open the ticket in a panel next to the table. The arrows at the top of the panel move to the previous and the next ticket, the Conversation and Details tabs switch between the thread and the ticket details, and the X button or Esc closes the panel.
On a phone the Inbox always shows the list.
Hide the menus
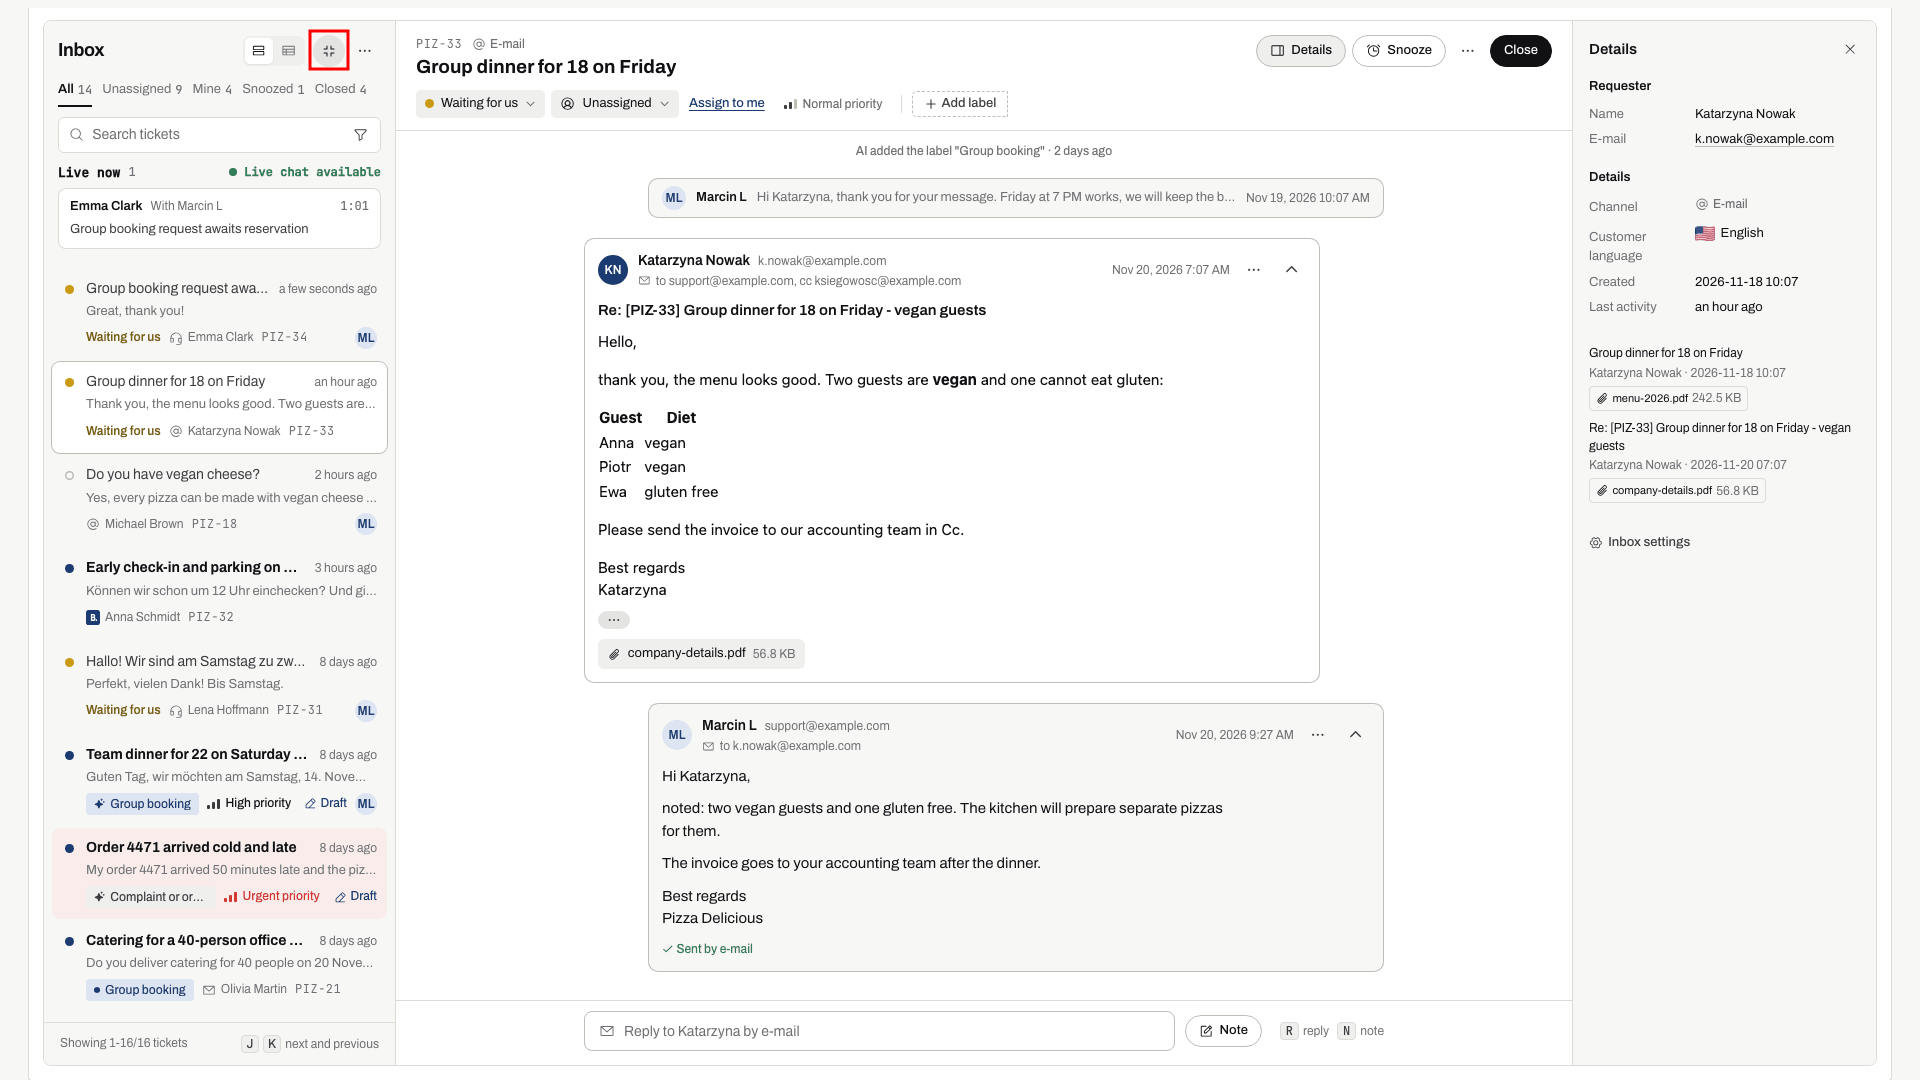
To get more room for tickets, click the button with the four corners next to the Inbox heading (Hide the menus (F)) or press F. The top menu of the panel and the tabs of the chatbot disappear and the Inbox fills the screen. Click the button again (Show the menus (F)), press F or press Esc to bring them back. The Inbox remembers your choice in this browser.
Keyboard shortcuts
The shortcuts work when you are not typing in a text field:
Jor the down arrow - next ticketKor the up arrow - previous ticketR- open the reply boxN- open the reply box on the Note tabI- show or hide the ticket detailsF- hide or show the menusEsc- close the ticket panel in the table view, clear the ticked tickets or bring back the menus
Work on a ticket
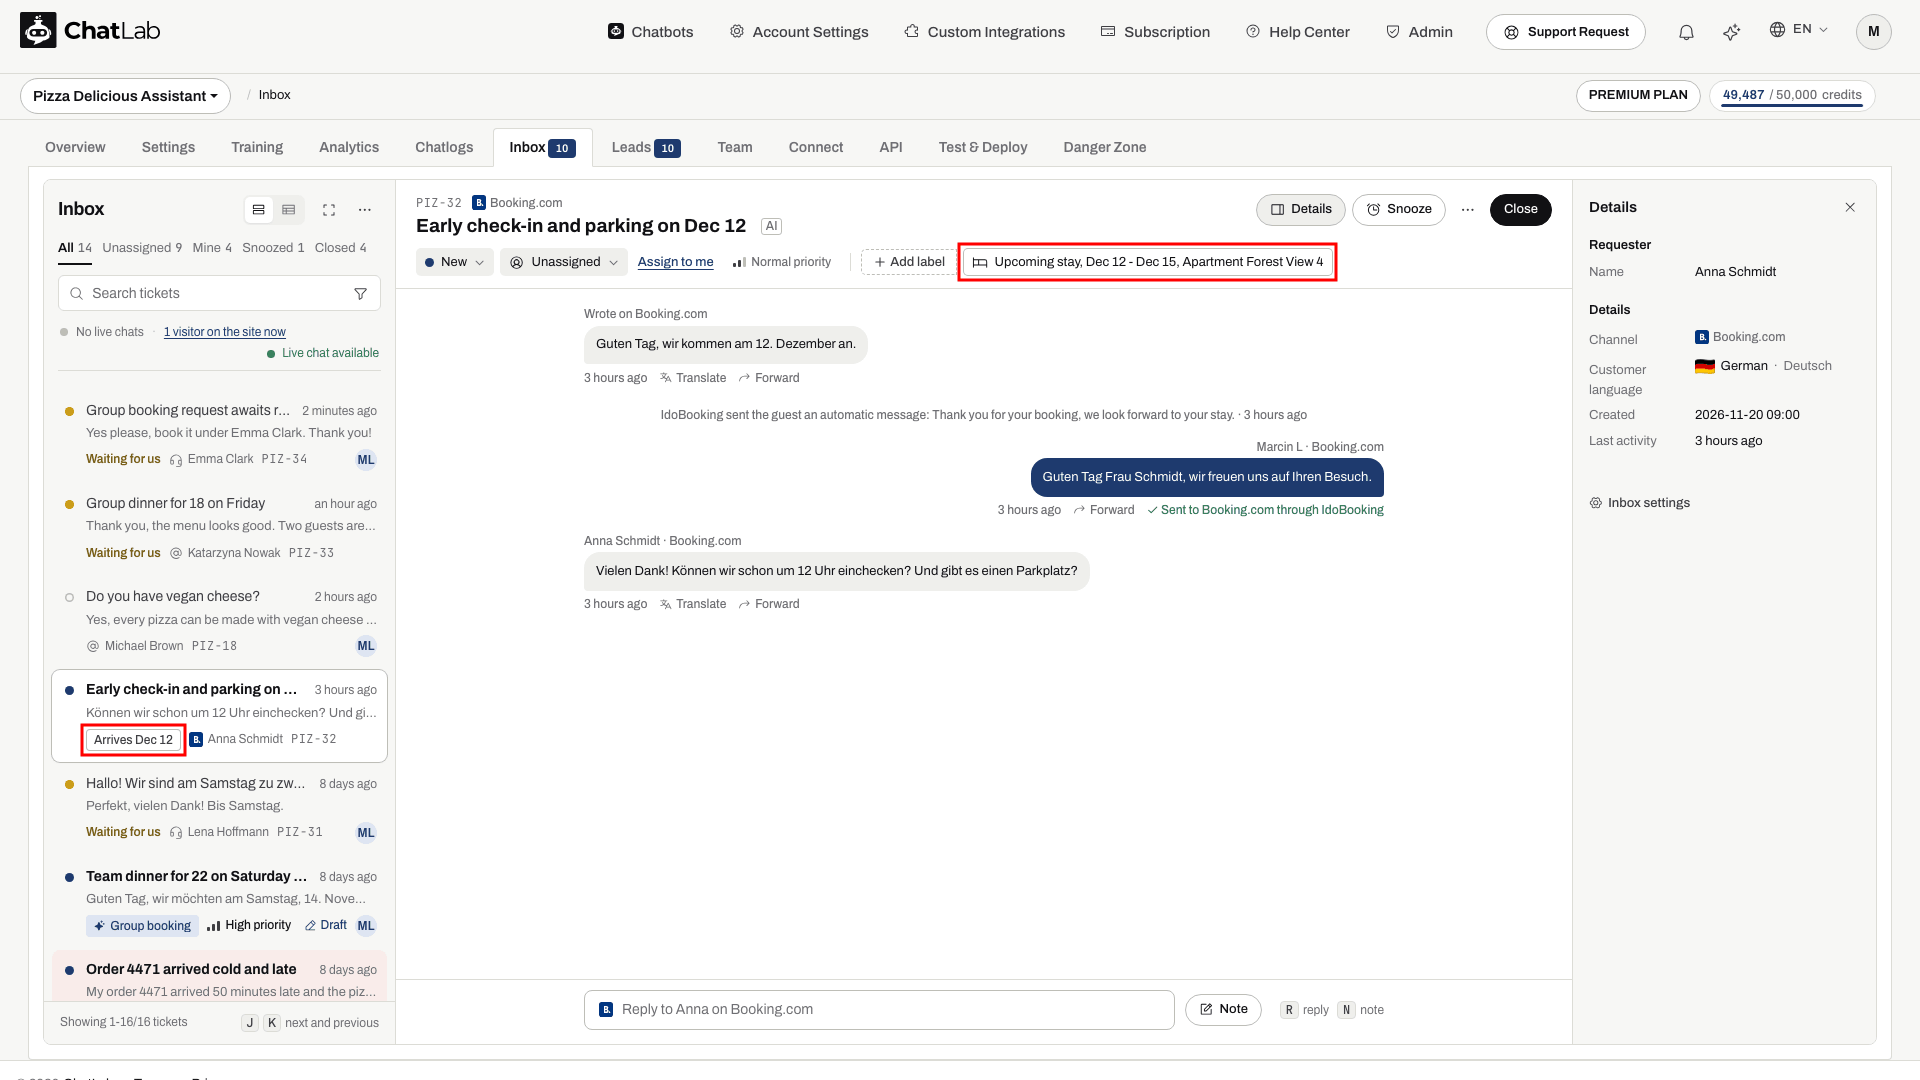
Click a ticket to open it. The header shows the ticket code and the channel above the title. On the right are the buttons Details (shows or hides the ticket details, also with I), Snooze, ... (the ticket menu) and Close (Reopen on a closed ticket). The row under the title holds the status, the assignee with Assign to me, the priority, the labels and + Add label (+ Label once the ticket has one).

- Priority - Urgent, High, Normal or Low. New e-mails get it from AI, marked AI; pick another one to override it.
- Status - switch the ticket between New, Waiting for us, Waiting for customer and Closed by hand. You rarely need to: replying sets Waiting for customer and a message from the customer sets Waiting for us. While a ticket is still New, more messages the visitor writes to the chatbot keep it in New, because nobody from your team has answered yet.
- Assignee - pick any teammate with access to this chatbot, or click Assign to me to take the ticket yourself. The new assignee is notified.
- Snooze - put the ticket aside until a preset time or a date you pick. It moves to the Snoozed view and comes back to the Inbox by itself at that time, or earlier when the customer writes. Back to the Inbox now wakes it up by hand.
- Close - mark the ticket as done and open the next ticket in the list, so you can work through the queue without going back to it. The closed ticket gets Reopen, and it also reopens by itself when the customer writes again or you send another reply.
At the end of the row under the title you see whether the customer is on your site right now (Online in the chat widget) or when they were last seen. This tells you whether a reply will reach them in the chat window or by e-mail.
The ... button (More actions) opens the ticket menu:
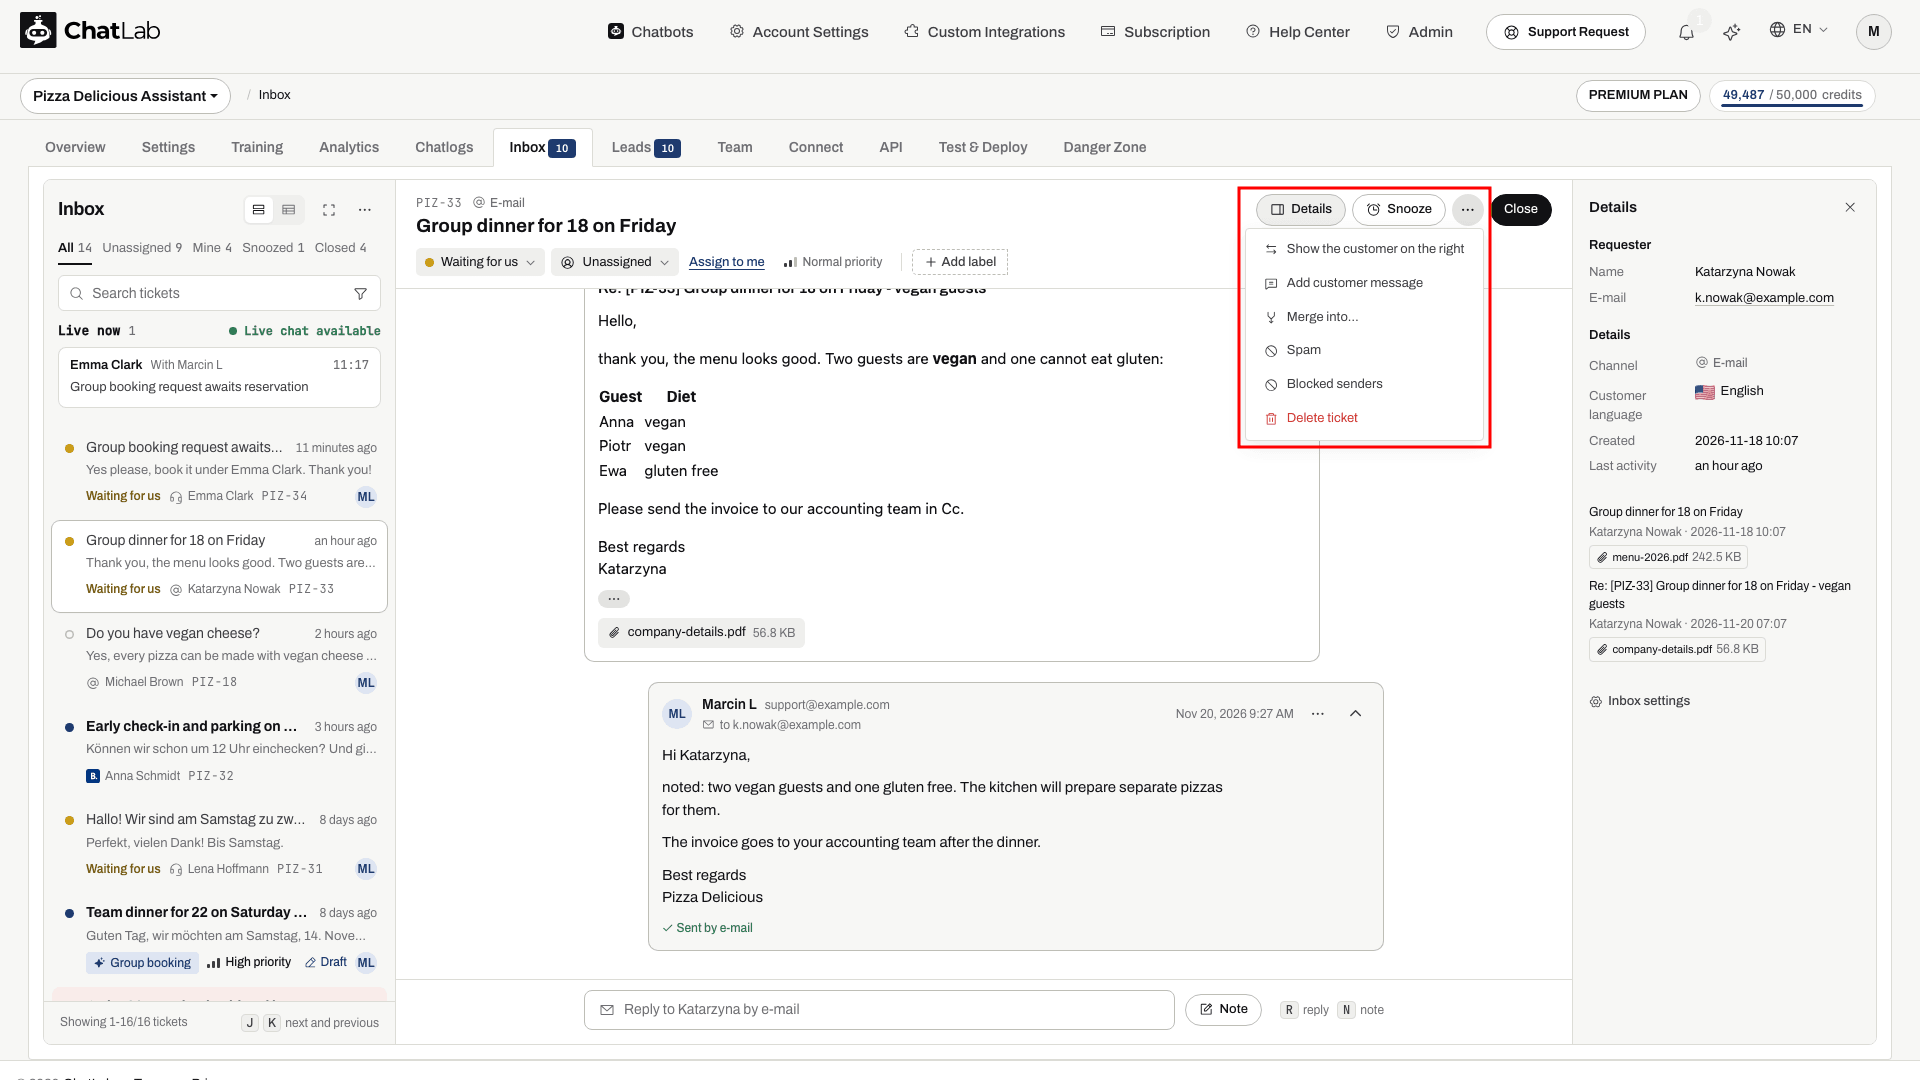
- Show the customer on the right or Show your team on the right - swaps the sides of the conversation. By default your team is on the right.
- Add customer message - paste something the customer sent you outside the Inbox, for example a reply that arrived in a personal mailbox. It is stored as the customer's message and marked as added by hand.
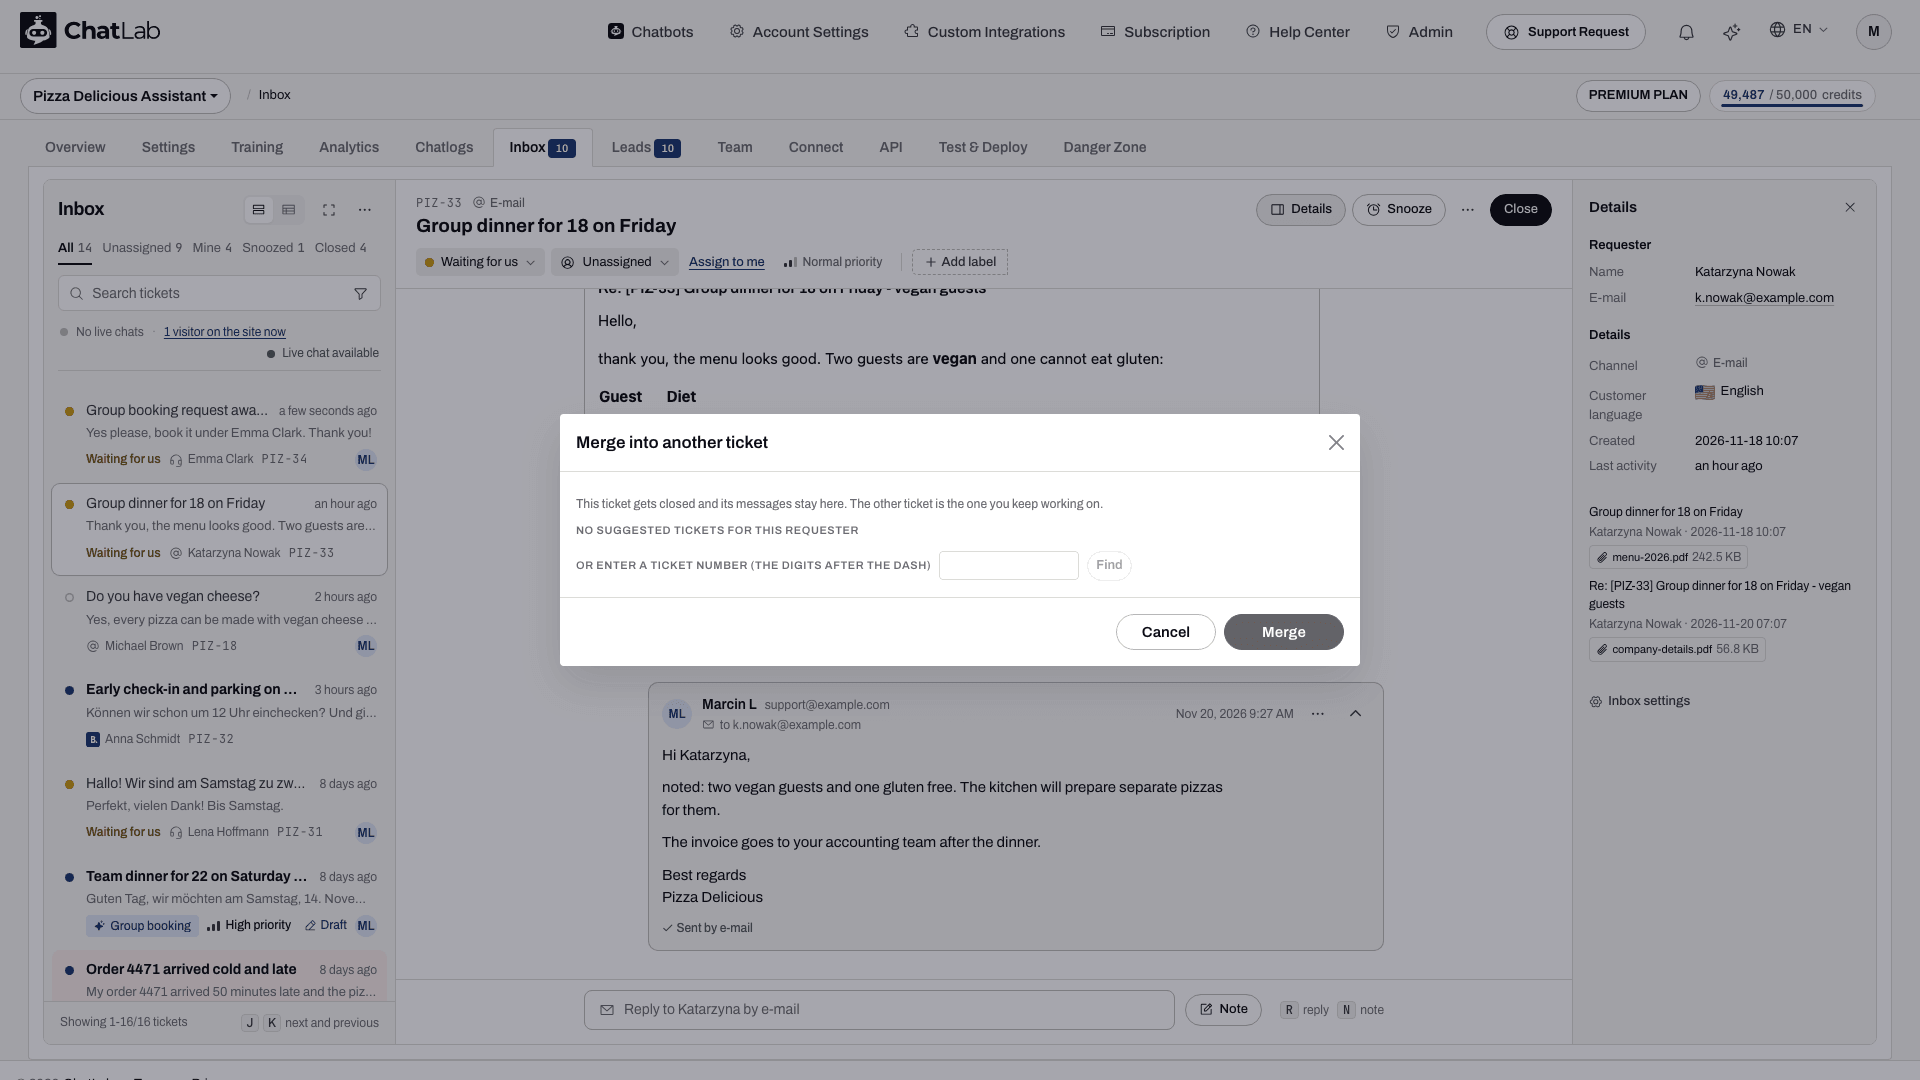
- Merge into... - when the same customer opened two tickets about one thing. The dialog suggests other tickets from the same requester, or you enter a ticket number (the digits after the dash) and click Find. After Merge, the messages and e-mails of this ticket move to the other ticket, which you keep working on and which gets the entry Merged from. This ticket is closed with the entry Merged into.
- Spam - closes the ticket and blocks the sender's e-mail address, so their future e-mails do not create or reopen tickets.
- Blocked senders - the list of blocked addresses, each with Unblock.
- Open in Chat Logs - on tickets from the chat widget, opens the conversation in Chatlogs.
- Delete ticket - removes the ticket with all its messages, notes and attachments after a confirmation. Only the chatbot owner can delete tickets. The e-mails themselves stay in your mailbox.
Read the ticket history
The center column shows everything that happened on the ticket, oldest first:
- Customer messages on the left, your replies on the right with the name of the person who sent them and a mark showing how they were delivered (for example Sent by e-mail).
- E-mails are shown as cards: the sender's name and address, who the e-mail went to (including cc), the subject, the message with its formatting and images, the attachments and, on your replies, how the e-mail was delivered. The last two e-mails are open; older ones are folded to one line with the sender and the start of the text, and a click opens them again. Quoted text from earlier e-mails hides behind the ... button under the message. Attachments appear as chips; click one to download it. The e-mails on a ticket are also listed in the Details panel with their attachments.
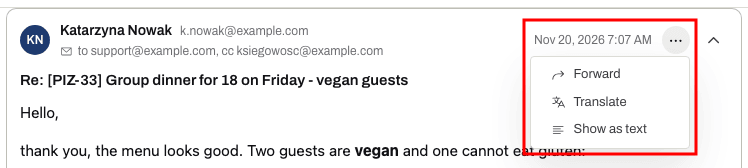
- The ... menu of an e-mail card (More actions) holds Forward, Translate and Show as text (plain text instead of the formatted e-mail). Chat messages keep Translate and Forward as links under the message. Translating is described in Read messages in your language.
- Internal notes on an amber background. The customer never sees them.
- Events as grey lines: status changes, assignments, live chats started and ended, merges and forwards. On tickets from the chat widget, where the conversation with the chatbot is shown, these events are folded into one line under the conversation, for example Ticket updates: 3. Latest: Live chat ended, 8 days ago. Click it to see the whole list.
- Conversation with the chatbot before this ticket - for tickets from the chat widget, a collapsed block at the top with what the visitor discussed with the chatbot before asking for help. Click it to expand.
- Chatbot answered meanwhile - when the customer keeps asking the chatbot while the ticket waits for you, the chatbot's answers are added to the thread, so you do not answer the same question twice.
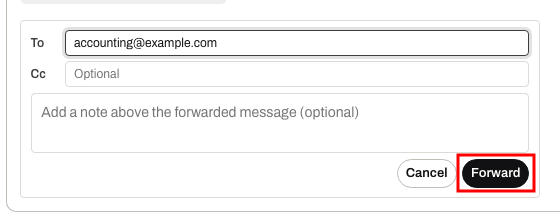
Forward a message. On an e-mail, open the ... menu of its card and click Forward; on a chat message, click Forward under it. Fill in To, optionally Cc and a note for the recipient, and click Forward. The message goes out from your connected mailbox together with the original text and its attachments, and the event Forwarded to appears in the thread. Forwarding needs a connected mailbox.
Read messages in your language
Click Translate in the ... menu of an e-mail card, or under a chat message (Translating shows while it works). The translation replaces the message in place: an e-mail keeps its layout, images and links, only the text changes, and a plain message keeps clickable links and e-mail addresses with long addresses shortened. A bar above the message says Translated into your team's language, with Show original to switch back and Show translation to return.
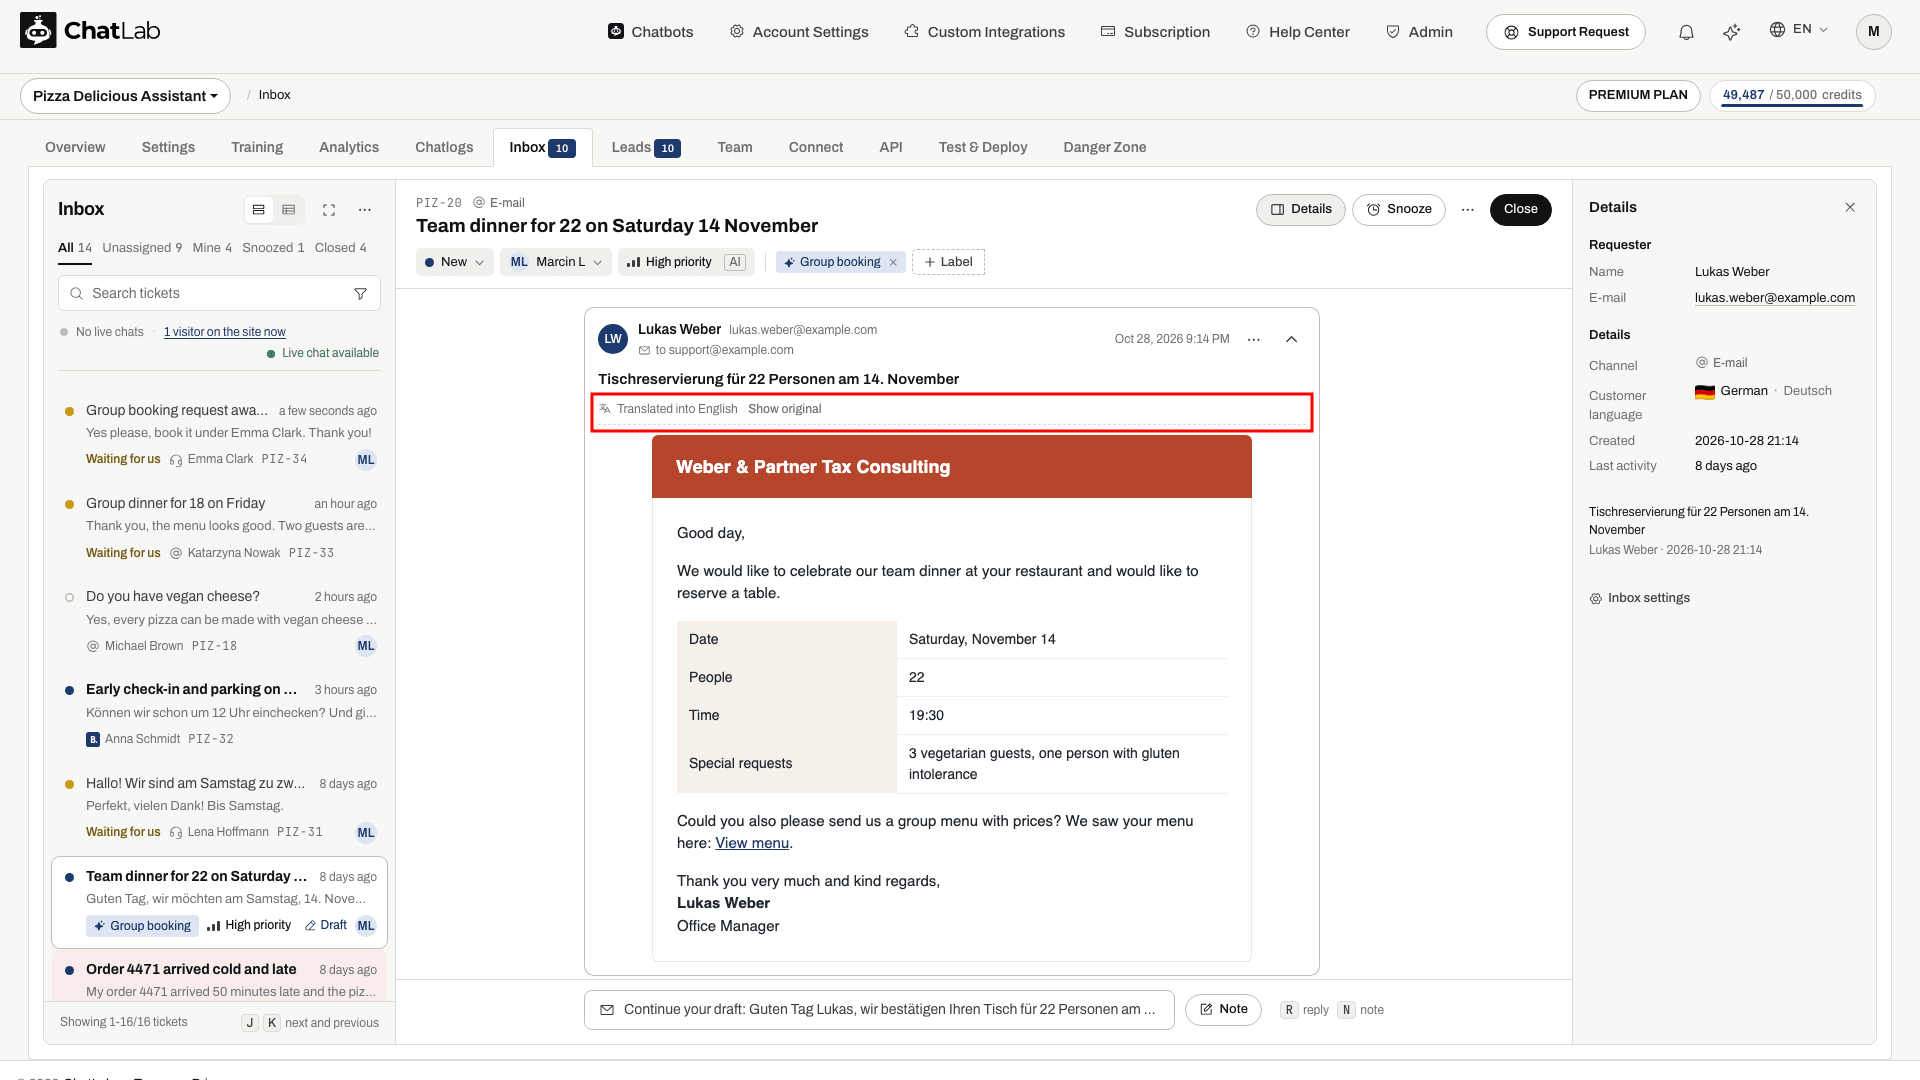
A message you translated once stays translated for the whole team, and the next time anybody opens the ticket it is shown in your language right away. The language is the Language of your team from Inbox settings. Each translation uses message credits once, the same as one chatbot reply on the translation model; a long e-mail is translated in parts, each costing one use.
Reply to the customer
The reply box at the bottom of the ticket starts folded to one line that says how the reply will go, for example Reply to Katarzyna by e-mail, Reply to Emma in the chat window or Reply to Anna on Booking.com. Click it or press R to open it. The Note button next to it, or N, opens it for an internal note instead. After you send a reply, the box folds again. During a running live chat it stays open.

The open reply box has two tabs, Reply and Note. The arrows in its top right corner enlarge it to half the screen, and the arrow next to them folds it.
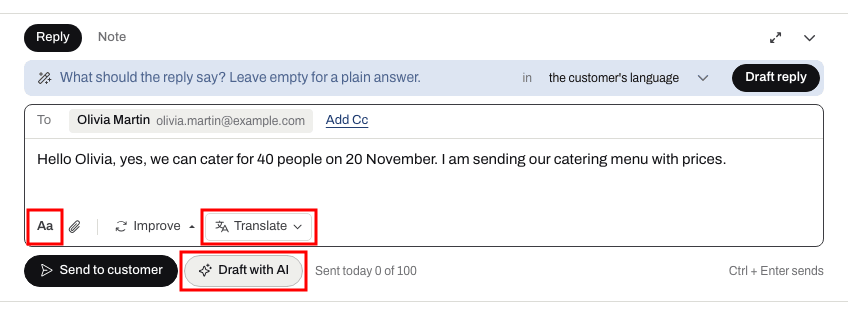
- Stay on the Reply tab. The To line shows who gets the reply and, for e-mail, the subject.
- Check where the reply goes. When a ticket from the chat widget has a known e-mail address, buttons next to the tabs let you choose E-mail, which sends the reply to the requester's address, or Chat message, which sends it to their chat window. Point at them to read the situation in words, for example that the customer has the chat window open or that they left an hour ago.
- Type your answer. Click Aa under the text to show the formatting buttons: bold, italic, bulleted and numbered lists, link and clear formatting (
Ctrl/Cmd + B,IandKwork either way). The buttons stay shown or hidden the way you left them. Pasted text always arrives as plain text. - Optionally click Add Cc to copy other addresses (up to 10, separated by commas). It is prefilled from the customer's last e-mail and works with a connected mailbox only.
- Optionally click the paperclip under the text to attach files. A ticket can carry up to 10 MB of attachments, and sending files by e-mail needs a connected mailbox.
- Click Send to customer, or press
Ctrl/Cmd + Enter.
How the reply travels:
- By e-mail - from your connected mailbox, in the same e-mail thread. Without a connected mailbox, ChatLab sends it from a no-reply address, and the customer's answer goes to the address set as Customer replies go to in Inbox settings instead of back to the Inbox.
- To the chat window, customer on your site - the reply appears immediately and opens a live chat: the chatbot goes quiet and you talk directly. This works even if live chat is switched off for visitors in Settings > Live Chat - that setting only controls whether visitors can ask for a person. Your messages in the chat window carry your name, so the customer always knows a person is writing. While the live chat runs, every reply you send keeps it open; it ends after 10 minutes without a message from either side.
- To the chat window, customer gone - when the customer left without an e-mail address or phone, the send button becomes Leave message. The message waits in their chat window, marked with your name, and shows if they come back before the conversation expires. The thread then tells you its state: Waiting in the chat window, not shown yet, Shown in the chat window with the time, or The conversation expired before the customer came back, not shown.
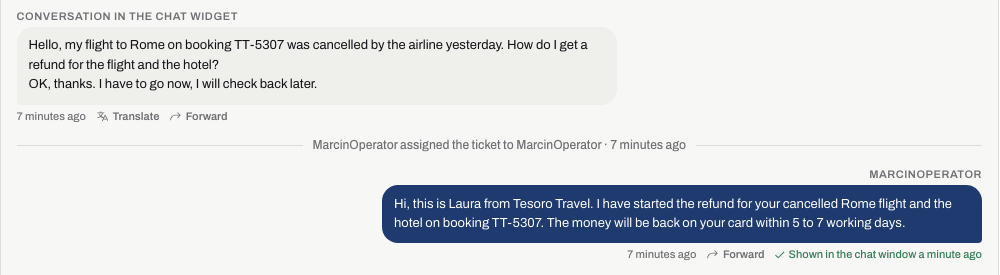
If the customer left no e-mail address and their conversation has expired, the reply box tells you that there is no way to reach them instead of letting you send into the void.
Unsent drafts are kept. Whatever you type is saved automatically every couple of seconds, so you can close the ticket, reload the page or switch devices and continue later. The ticket list marks tickets with an unsent draft with Draft, the folded reply box starts with Continue your draft, and teammates opening the ticket see Draft by with your name. Discard, next to Draft saved, throws the draft away together with its pending attachments.
Daily send limit. With a connected mailbox, the line next to the send button shows Sent today N of M: how many e-mails the mailbox has sent today out of its daily limit. When the limit is reached, sending by e-mail stops until the next day.
Booking.com and Airbnb guests
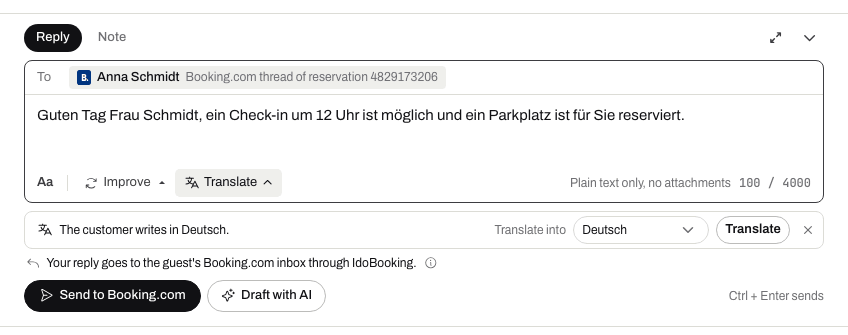
Guest messages from Booking.com and Airbnb that reach ChatLab through a connected booking system, such as IdoBooking, become tickets too. The channel shows the portal, and the folded reply box says, for example, Reply to Anna on Booking.com. Your reply goes back to the guest's inbox on that portal, so it is plain text only, up to 4000 characters, without attachments. A counter under the text shows how many characters you have used. Click Send to Booking.com (or the name of the other portal) to send it.
Where the guest is in their stay. When a ticket is linked to a reservation (Booking.com, Airbnb, Vrbo or a note added to an IdoBooking reservation), the ticket list and the table show a stay badge: Arrives Dec 12, Staying now, Left Nov 14 or Cancelled stay. Point at it for the full dates, the number of nights and the room. In the ticket header, a button with the stay, the dates and the room, for example Upcoming stay, Dec 12 - Dec 15, Apartment Forest View 4, opens the ticket details with the reservation card.
Draft a reply with AI
- Open the reply box and click Draft with AI next to the send button. A line opens above the text with the field What should the reply say? Leave empty for a plain answer. Optionally type a short instruction there, for example "confirm the date change and quote the fee".
- Pick the language of the draft next to in. It starts with the language the customer writes in.
- Click Draft reply. The draft appears in the reply box, marked AI draft, edit before sending. It is built from the ticket, the conversation and your chatbot's knowledge.
- Edit it and send it yourself. Draft again writes a new version.
Nothing written by AI is ever sent automatically. Each draft uses message credits, the same as one chatbot reply on the model chosen in Inbox settings, see What is a message credit.
Improve rewrites the text you already have: Rephrase, More formal, More friendly or Fix spelling. Undo brings back your own wording after a change.
Translate your reply. Click Translate under the text to open the translation line, then pick the language next to Translate into and click Translate. When ChatLab knows the customer writes in another language than you, the line opens by itself with The customer writes in and their language already chosen. You write in your own language, check the translation and send it in theirs.
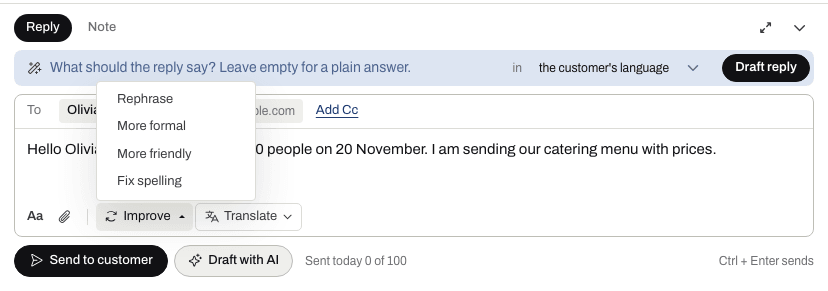
Automatic drafts. In Inbox settings > General you can switch on Draft a reply automatically when I open a ticket that waits for us. The setting applies only to the device you are using, and every automatic draft uses credits.
Labels
Labels sort tickets your own way: group enquiries, invoices, complaints. The same list is used for tags on conversations in Chat Logs, see Conversation tags.
- Add a label - click + Add label in the ticket header, type to search and pick one, or type a new name and click Create. The list has two groups: Your labels and Ready-made tags such as The chatbot did not know.
- Remove a label - click the small x on the label.
- Labels set by AI - a label with a description can be added to new e-mails by AI; it is marked AI. A tag that opens a ticket from a conversation is put on that ticket as a label too.
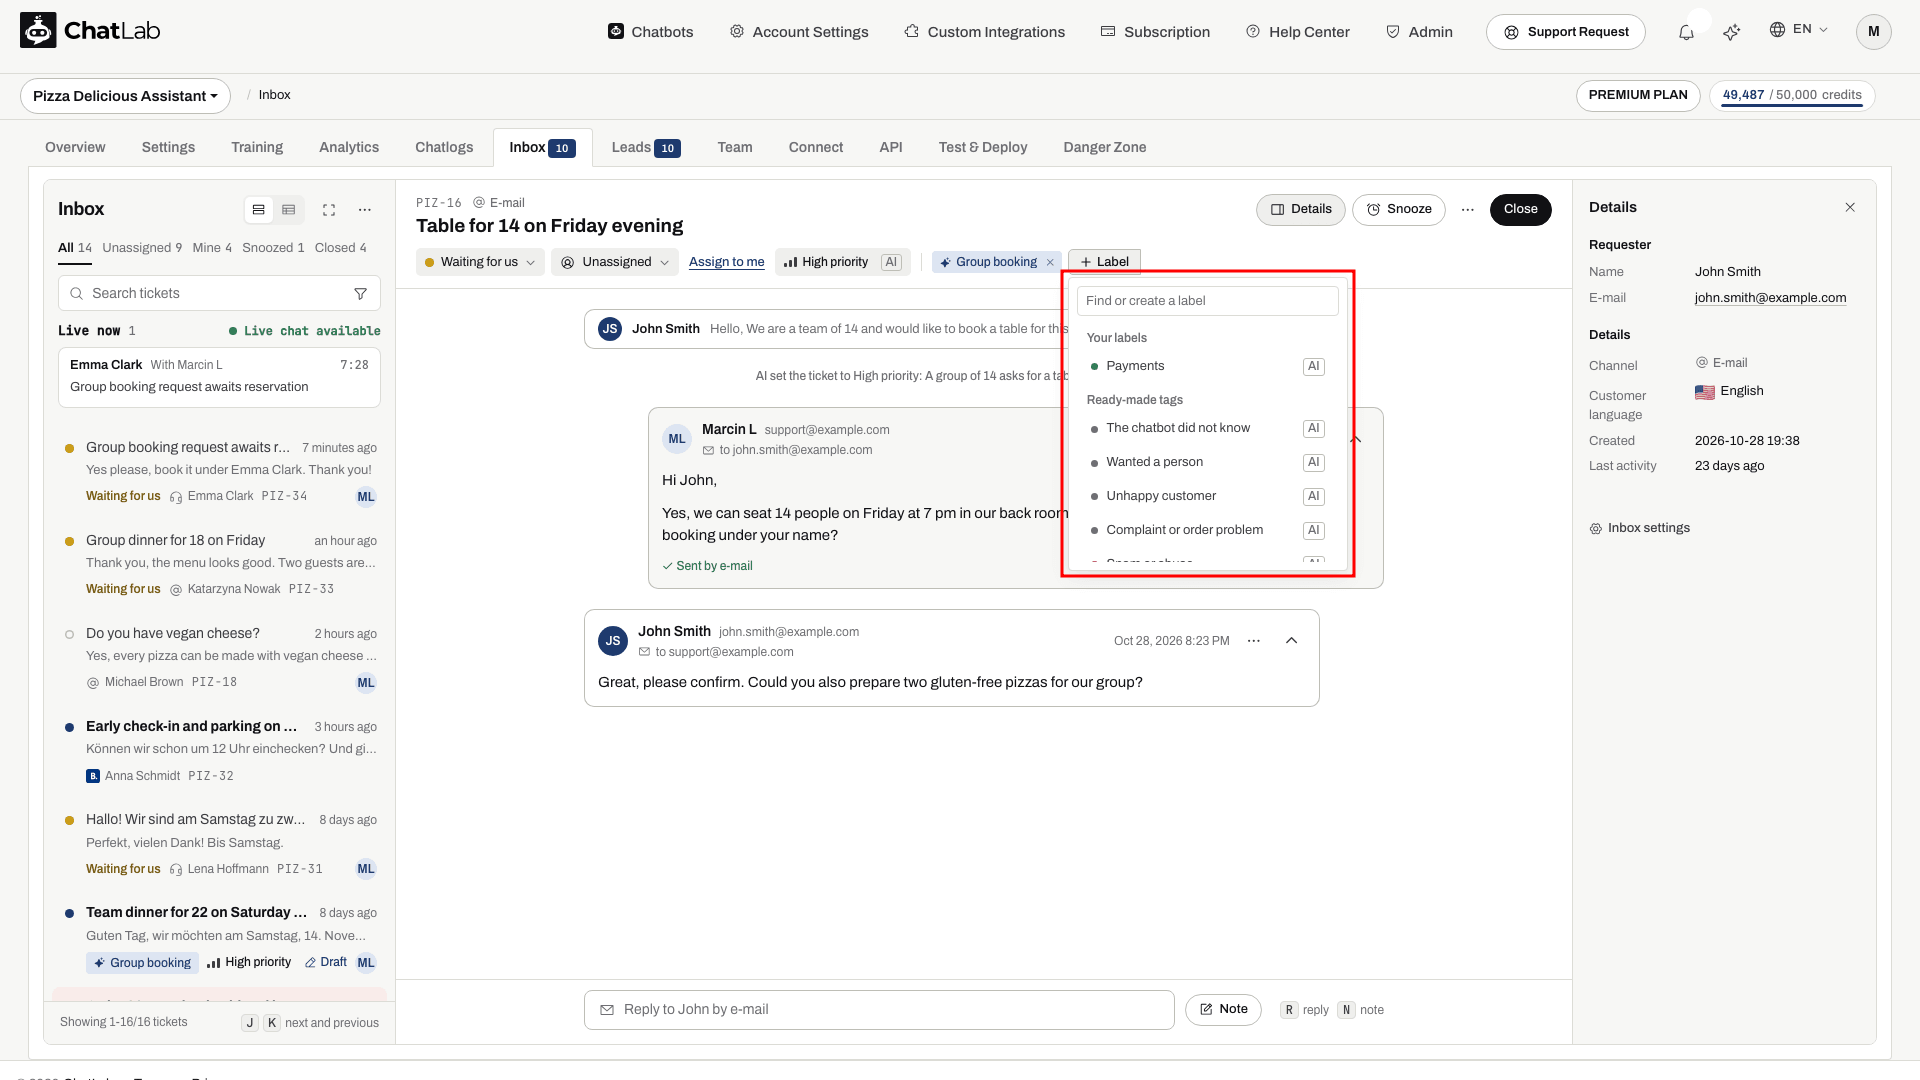
Create, describe and delete labels in Inbox settings > Labels.
Write an internal note
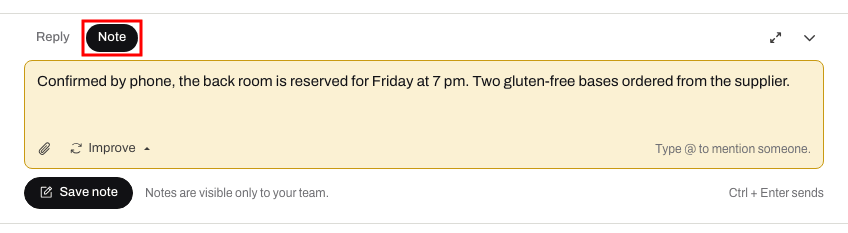
Click Note next to the folded reply box, press N, or click the Note tab of the open reply box. The reply box turns amber so a note is never mistaken for a reply. Type @ to mention a teammate and pick them from the list: they get a notification. Click Save note. Notes are visible only to your team and are also collected in the Notes section of the Details panel.
Start a ticket from Chat Logs
Sometimes you spot a conversation in Chatlogs that somebody should follow up, even though the visitor never asked for help. Select your chatbot, open Chatlogs and select the conversation. Depending on the situation you have three options.
Create ticket. Click Create ticket in the bar above the conversation.
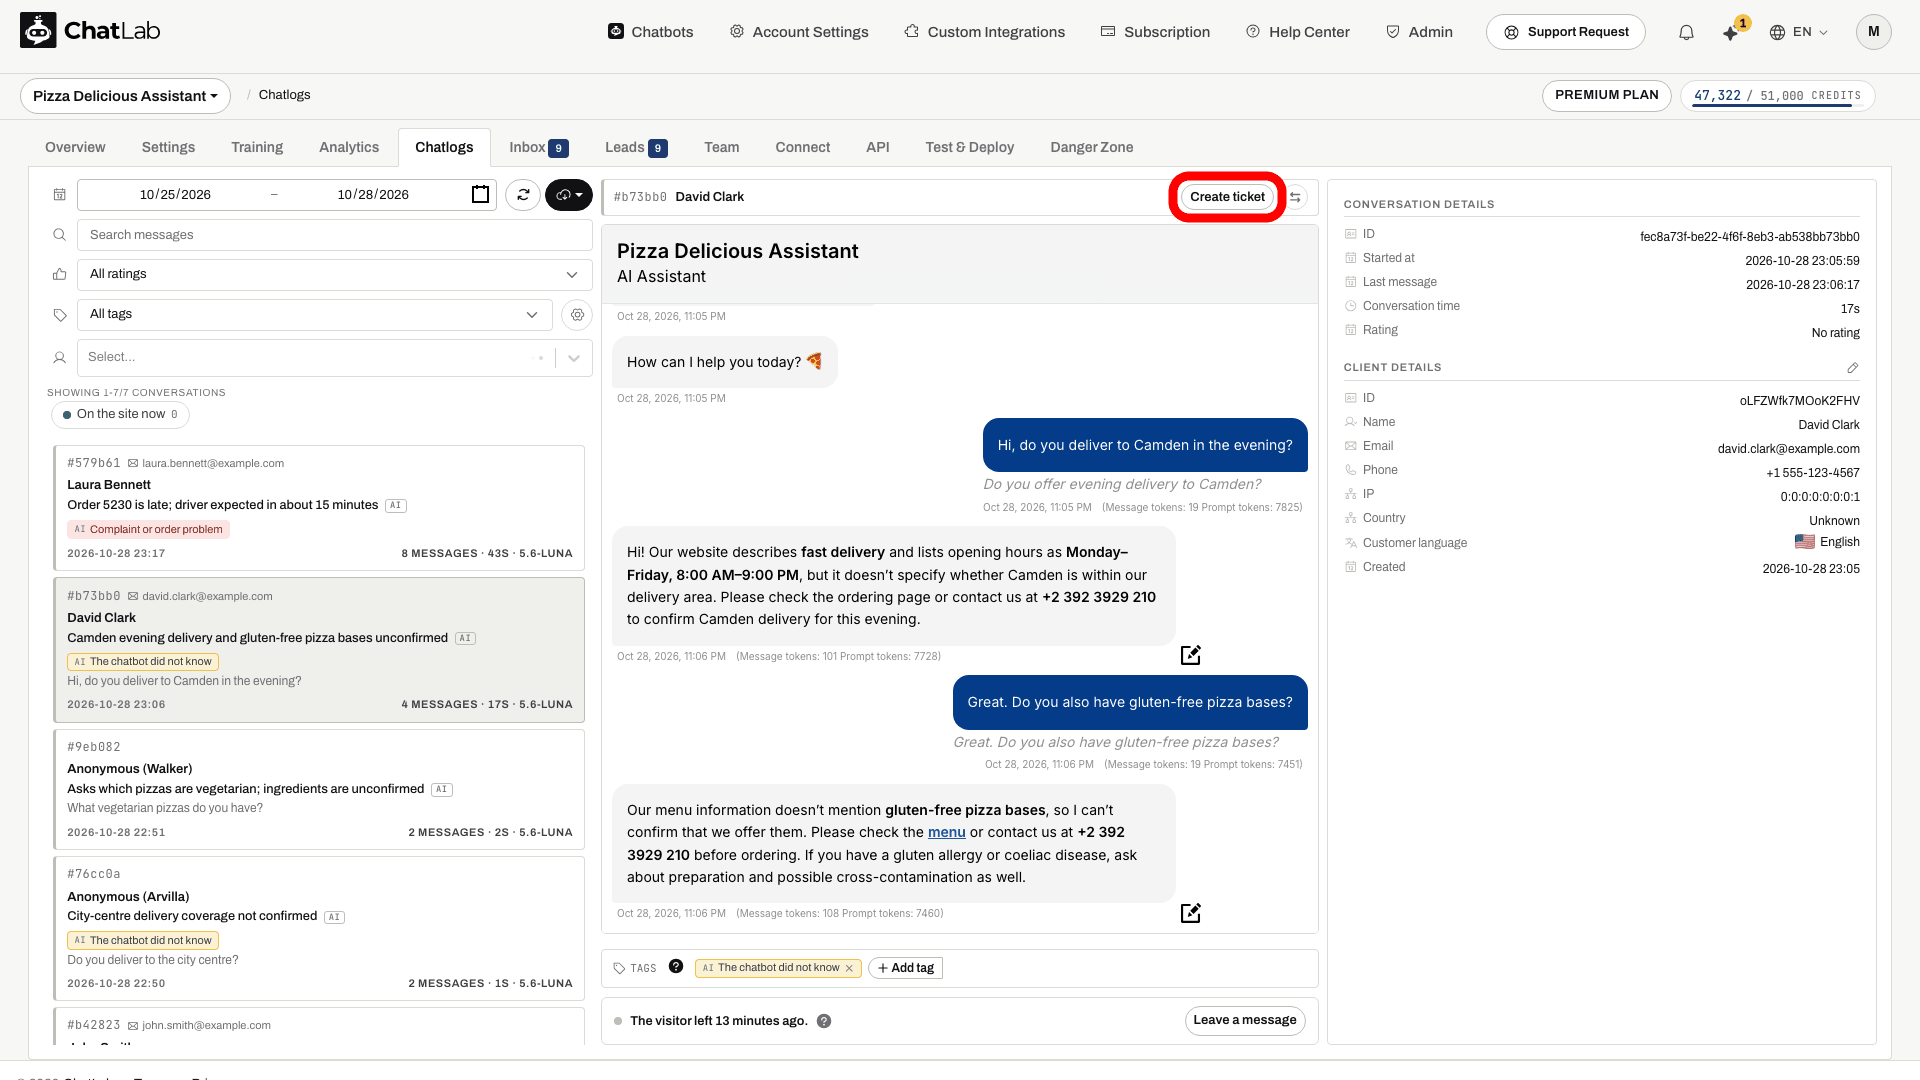
The subject and message are prefilled from the conversation, and the e-mail address from the client details if one was collected. Correct them if needed and click Create ticket - you land on the new ticket in the Inbox.
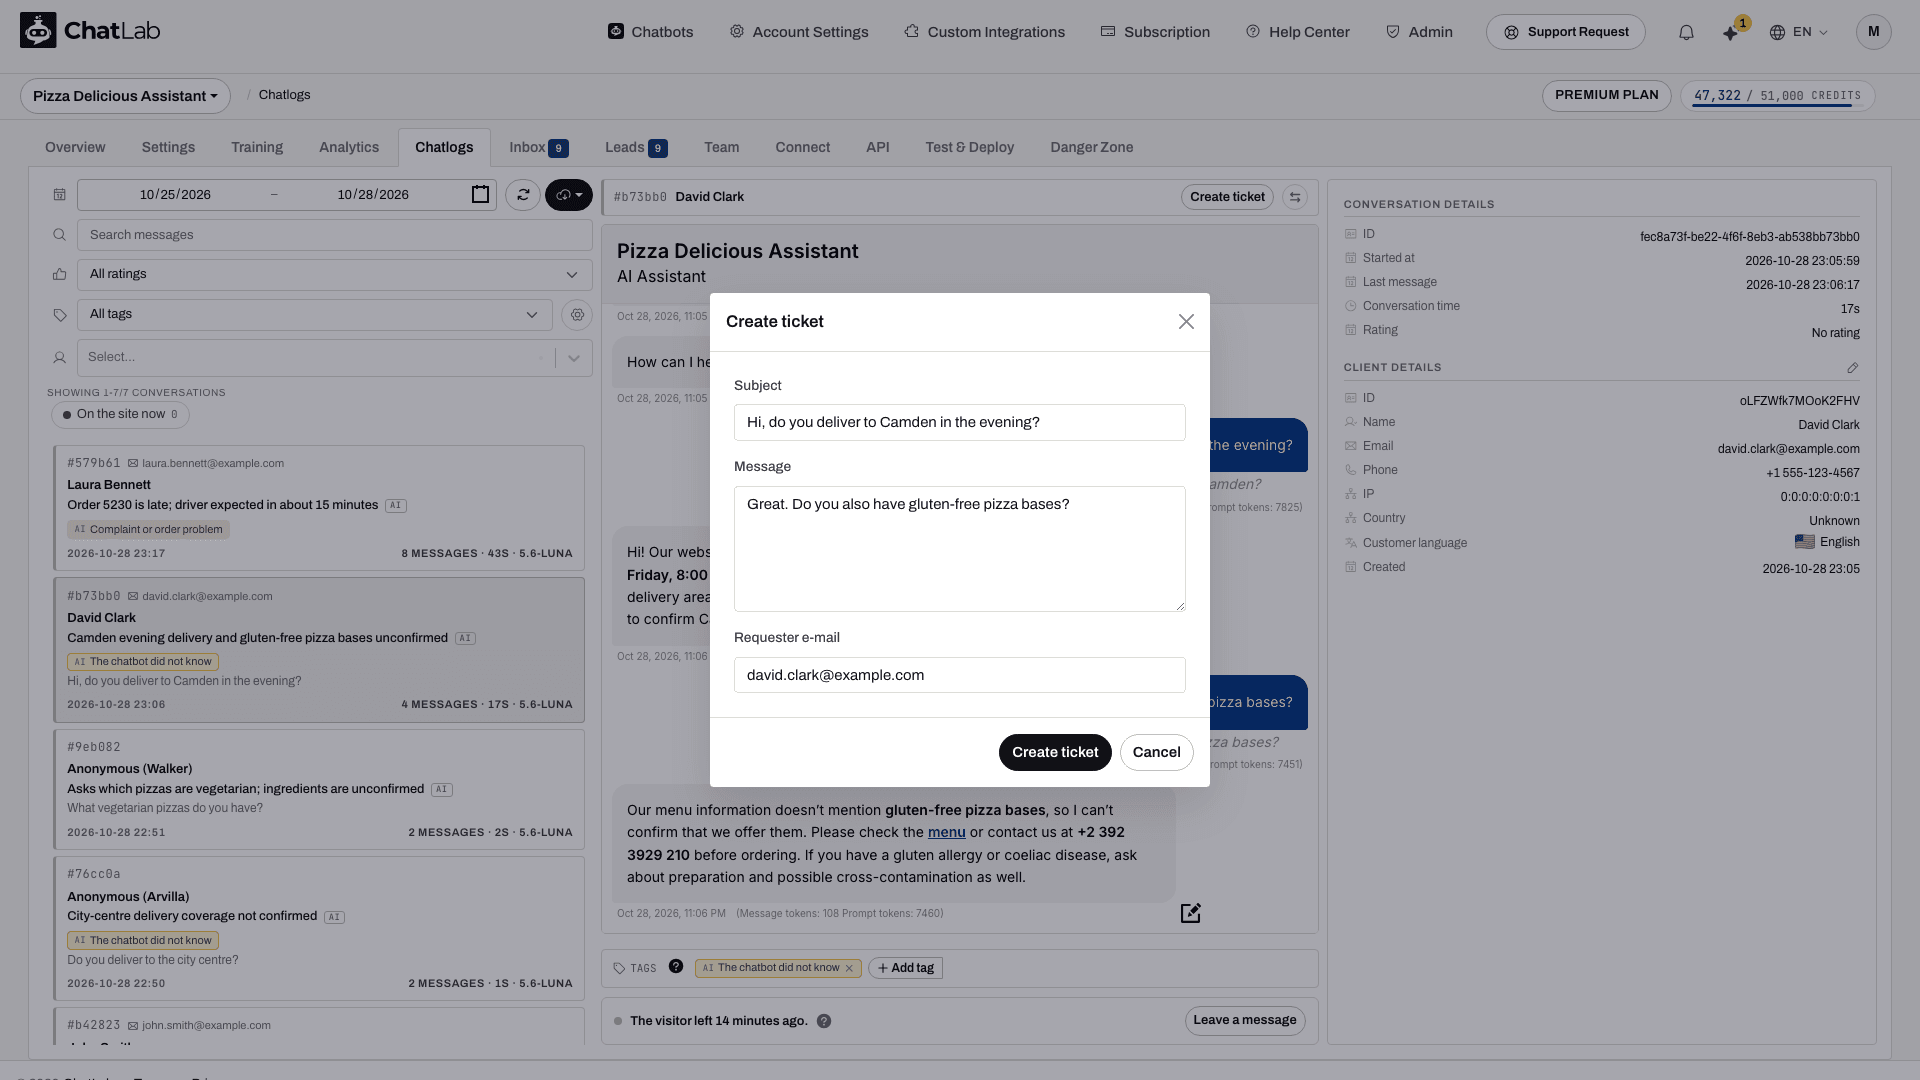
Once a conversation has a ticket, the button is replaced by a chip with the ticket code that takes you straight to it.

Join conversation. When the visitor is on your site right now, a line under the conversation says The visitor is on the site now (the question mark explains what joining does). Click Join conversation. This opens a live chat in that conversation and a ticket in the Inbox assigned to you; the chatbot goes quiet until you end the chat. You can join even if live chat is switched off in your chatbot's settings. The gear next to the button leads to your Operator profile, where you set the name customers see, and to Notifications, so you hear when the customer answers.
Leave a message. When the visitor has left, the line says when. Click Leave a message, type it and click Leave message. It waits in their chat window and shows if they return before the conversation expires. A ticket opens for it, so you see in the Inbox when the message has been shown. Once the chat window has expired, the line says so instead: a visitor who left an e-mail address is answered from the Inbox by e-mail.
Connect your mailbox
With a connected mailbox, e-mails that customers send to that address become tickets, and your replies go out from that address in the same e-mail thread. Without one, the Inbox still works for chat, forms and leads, and e-mail replies go out from a no-reply address. The number of mailboxes you can connect depends on your plan; a chatbot has one mailbox.
Use a dedicated support address for this, such as support@yourcompany.com, not a personal mailbox: every e-mail that arrives there becomes a ticket.
- Select your chatbot and open the Connect tab. Click the E-mail inbox tile. You get to the same place from the Inbox: open the ... menu next to the Inbox heading, choose Inbox settings and go to the E-mail account tab.
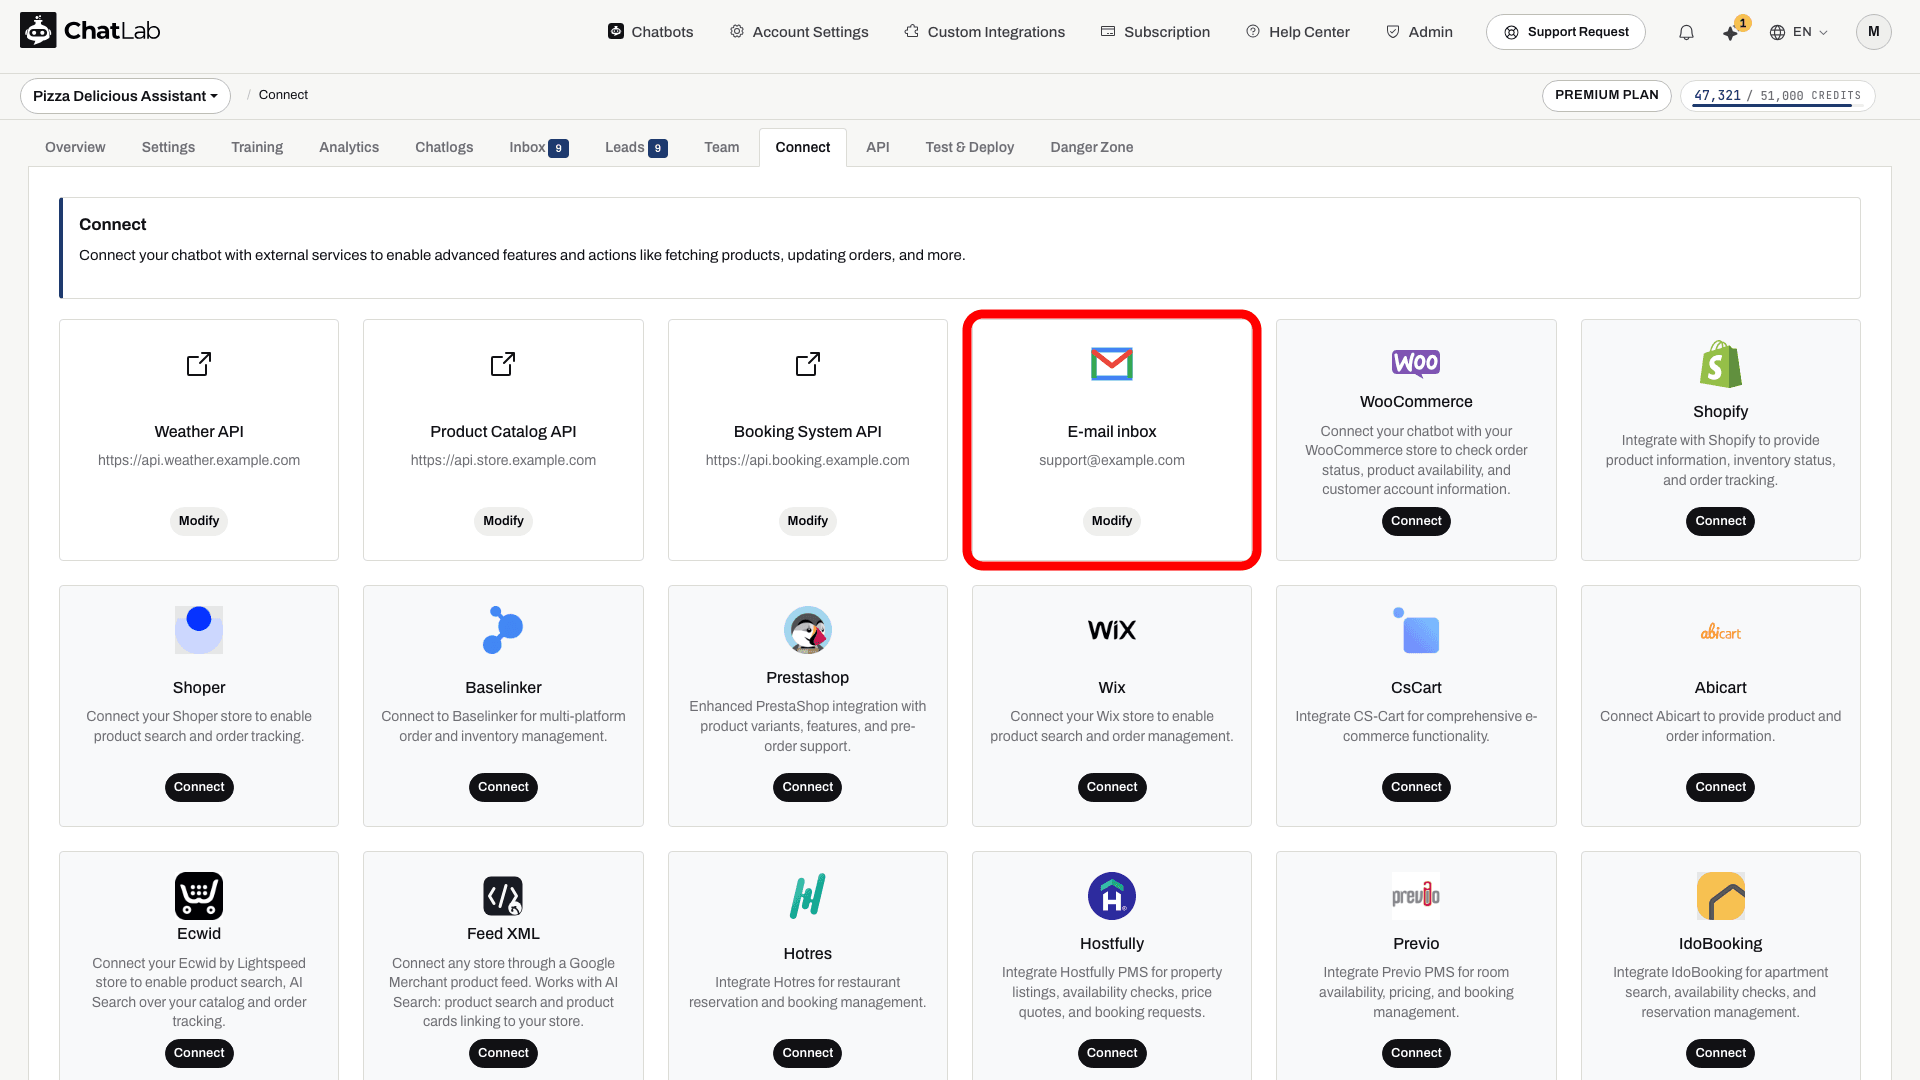
- Click Connect, read and accept the mailbox terms the first time, and choose your e-mail provider. ChatLab fills in the server settings for common providers; for any other mailbox choose Other / Custom and enter the IMAP (or POP3) and SMTP details. Many providers require an app password instead of your normal password.
- Click Test Connection, then save. The mailbox is checked for new e-mails regularly, and Check now, or Refresh in the ... menu of the Inbox, checks it immediately.
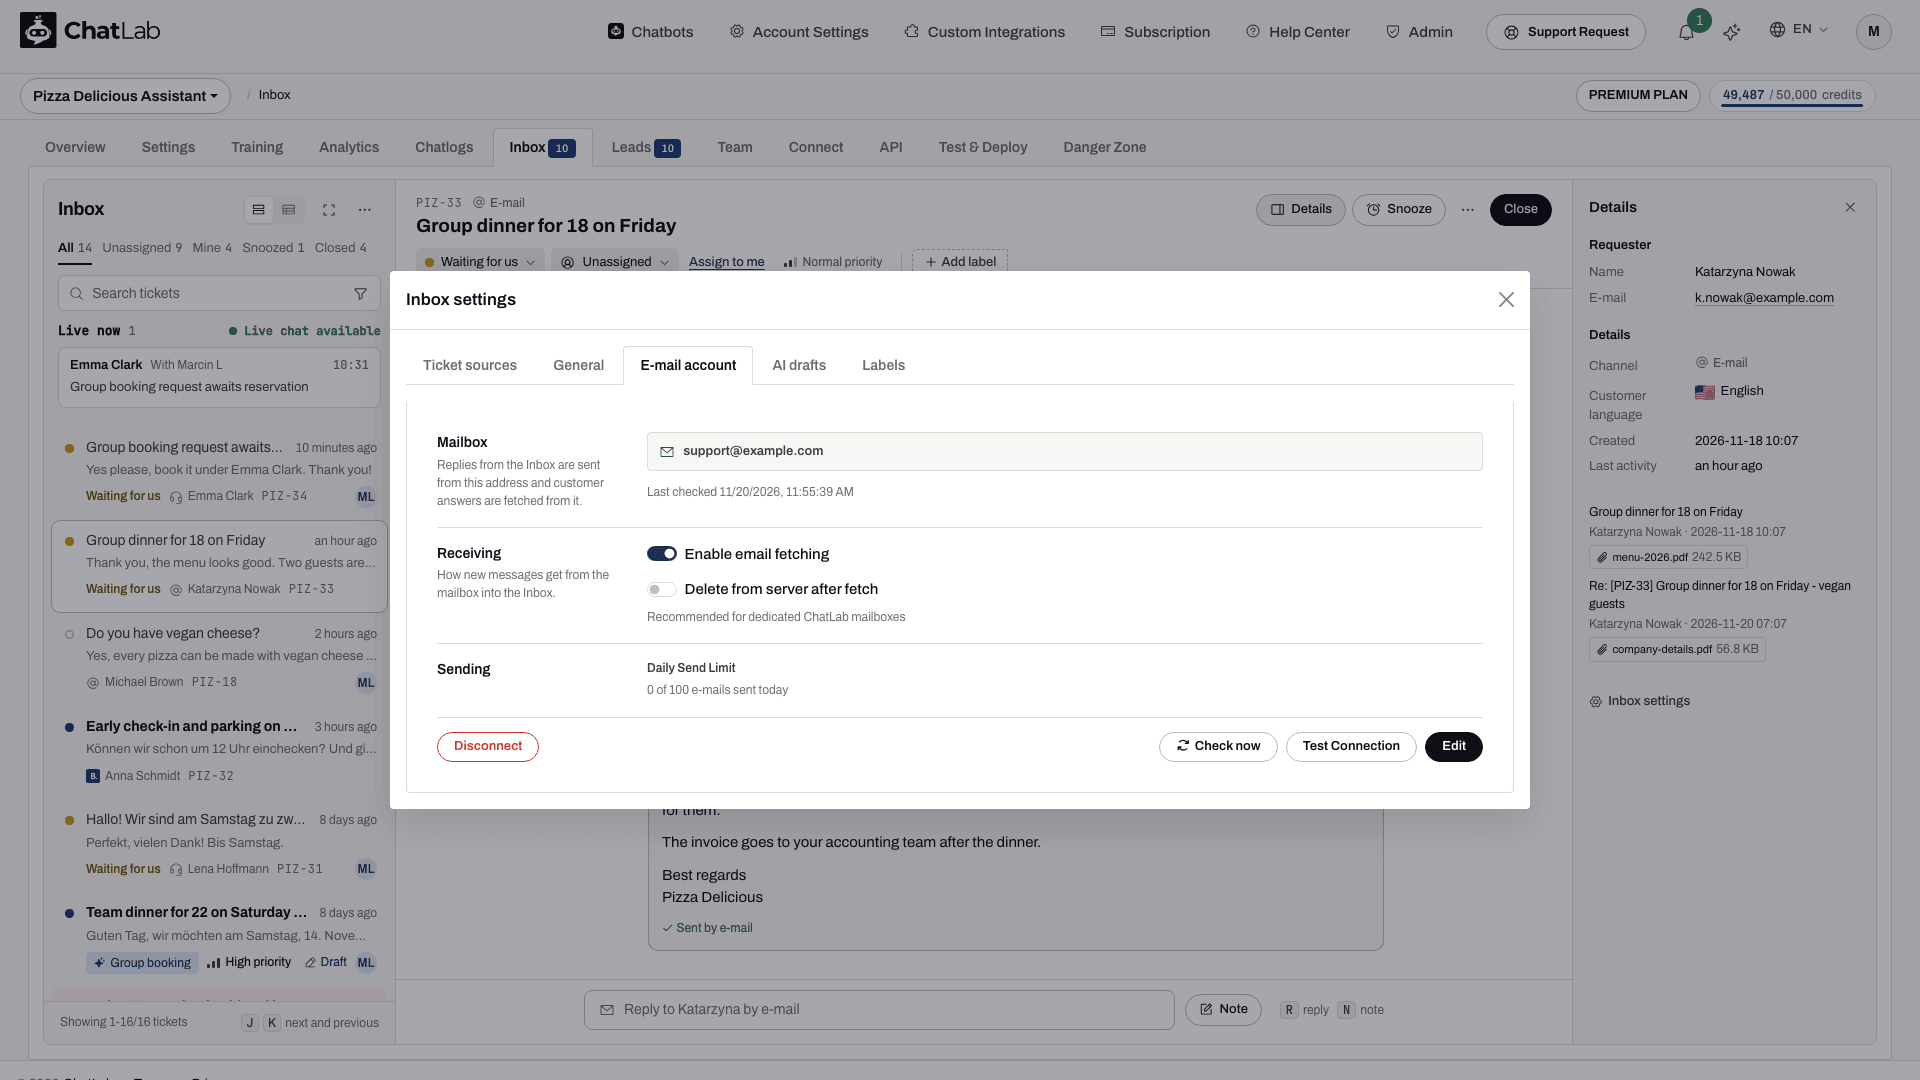
On the E-mail account tab you also find:
- Enable email fetching - turn off to stop new e-mails from becoming tickets without disconnecting the mailbox.
- Delete from server after fetch - removes e-mails from your mail server once ChatLab has them. Recommended only for mailboxes used exclusively by ChatLab, because other e-mail apps will no longer see those e-mails.
- Daily Send Limit - how many e-mails the mailbox may send per day (up to 300) and how many it has sent today. Change it with Edit.
- Edit - change the address, server settings or password.
- Disconnect - removes the mailbox after a confirmation. The stored copies of its e-mails and their attachments are deleted; the ticket messages keep their text.
If your plan stops covering the mailbox, it is paused and a note on this tab explains how to resume.
Retention. E-mails that became part of a ticket stay with the ticket. E-mails that never became a ticket are deleted automatically after the retention period you set in Danger Zone, see Deleting your data.
Inbox settings
Open the ... menu next to the Inbox heading and choose Inbox settings (or click Inbox settings at the bottom of the Details panel). The settings have five tabs: Ticket sources, General, E-mail account, AI drafts and Labels.
Ticket sources - everything that can open a ticket in this Inbox (contact form, leads, live chat, the e-mail inbox and, with IdoBooking, reservation notes), each with its state and a link to its settings, plus Create a test ticket to try answering before the first real request arrives. Below them, Tickets from conversations: switch Open a ticket on for any conversation tag. A conversation that gets that tag becomes a ticket, labelled with the tag; if it already has an open ticket, the tag is added to it instead. See Conversation tags.
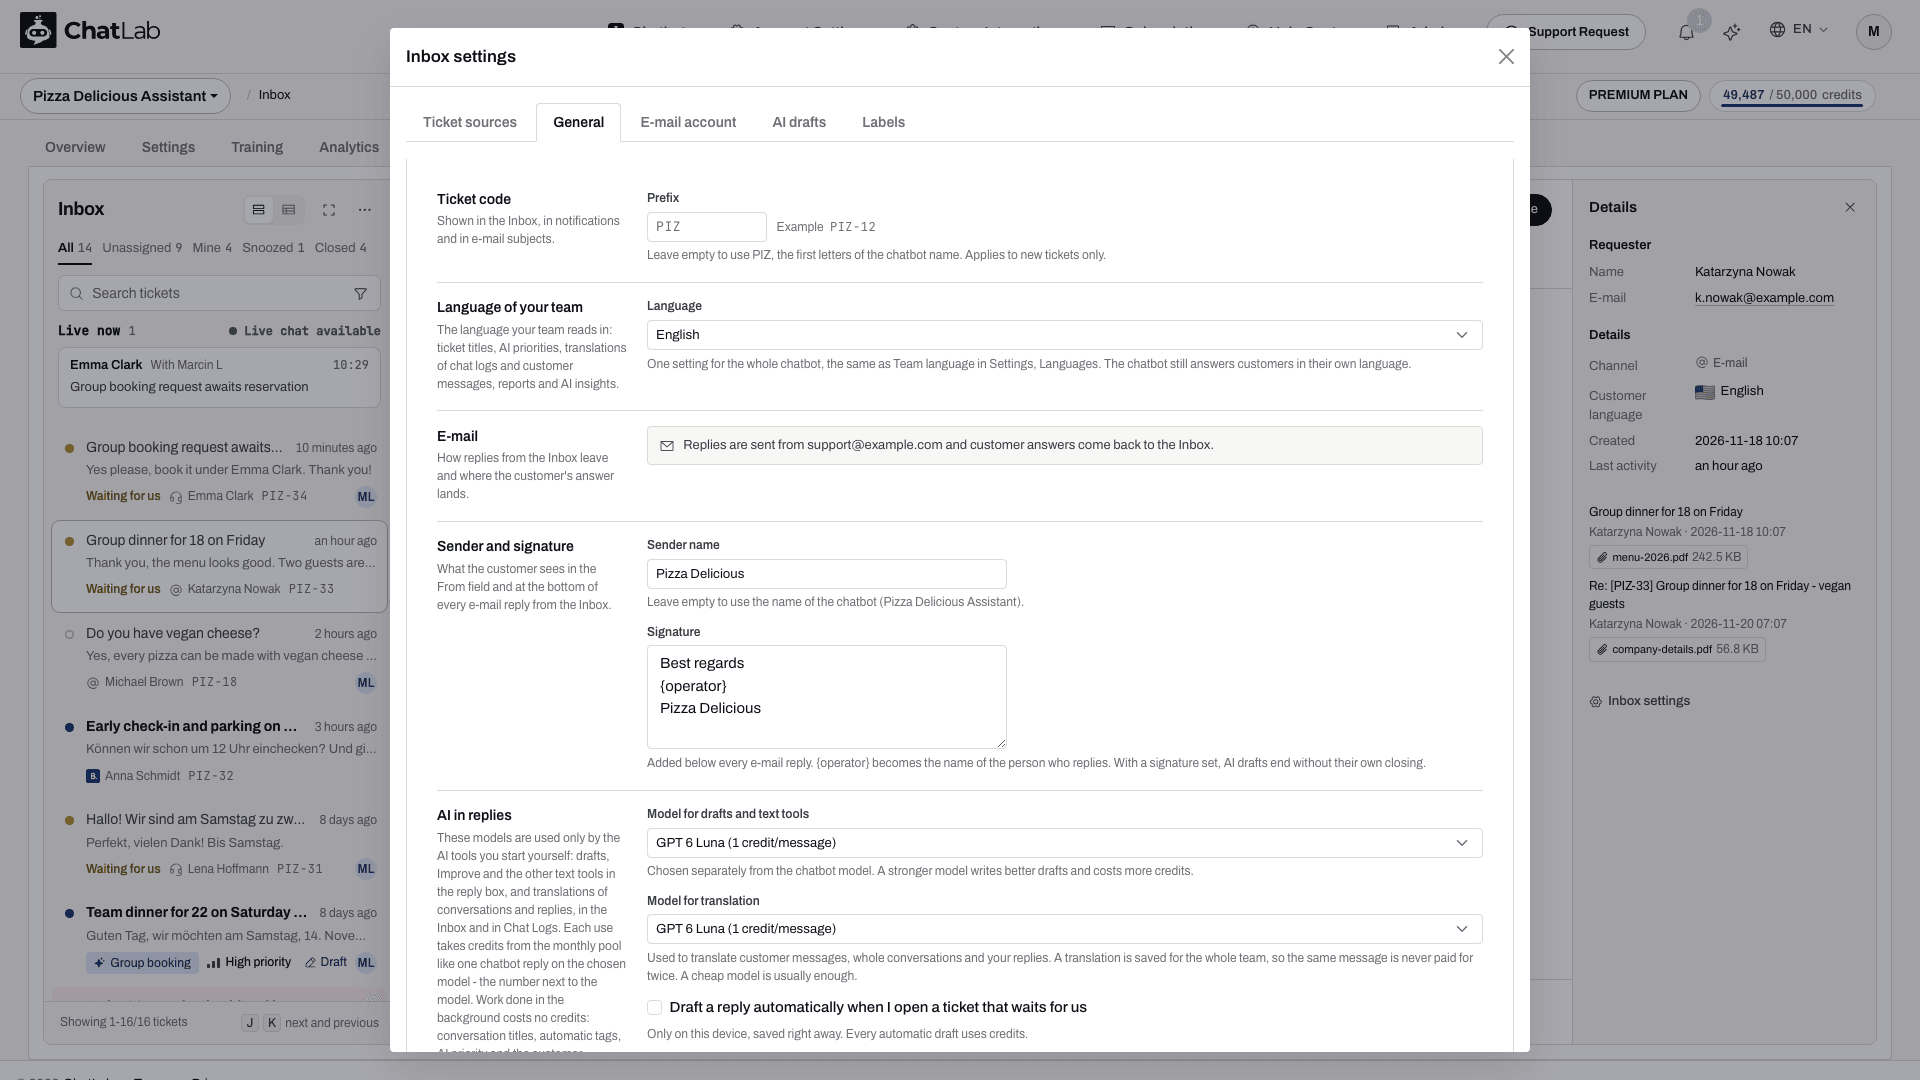
General
- Ticket code - the Prefix of ticket codes, 2 to 8 letters or digits. Leave it empty to use the first letters of the chatbot's name. A change applies to new tickets only.
- Automatic closing - Close inactive tickets automatically is on by default: a ticket with no activity for the number of Days without activity (7 by default, from 1 to 365) goes to Closed by itself, with the entry Closed automatically: no activity for N days in its history. Snoozed tickets and tickets assigned to someone stay open. A ticket closed this way stays in the Closed view and opens again when the customer writes back, by e-mail or in the same chat.
- Language of your team - the language your team reads in: ticket titles, AI priorities, translations of chat logs and customer messages, reports and AI insights. It is one setting for the whole chatbot, the same as Team language in Settings > Languages; the chatbot still answers customers in their own language.
- E-mail - with a connected mailbox, the address replies are sent from. Without one, Customer replies go to sets where customers' answers to your no-reply e-mails land; leave it empty to use the address shown under the field.
- Sender and signature - the Sender name customers see in the From field, and a Signature added below every e-mail reply;
{operator}becomes the name of the person who replies. With a signature set, AI drafts end without their own closing. - AI in replies - Model for drafts and text tools and Model for translation, chosen separately from the chatbot model. These models are used only by the AI tools you start yourself, and each list shows the credits per use: a stronger model writes better drafts and costs more credits, and a cheap model is usually enough for translation. Work done in the background (titles, automatic tags, AI priority, customer language) costs no credits.
- Draft a reply automatically when I open a ticket that waits for us - saved for this device only, right away.
Click Save changes after editing.
E-mail account - the connected mailbox, described in Connect your mailbox.
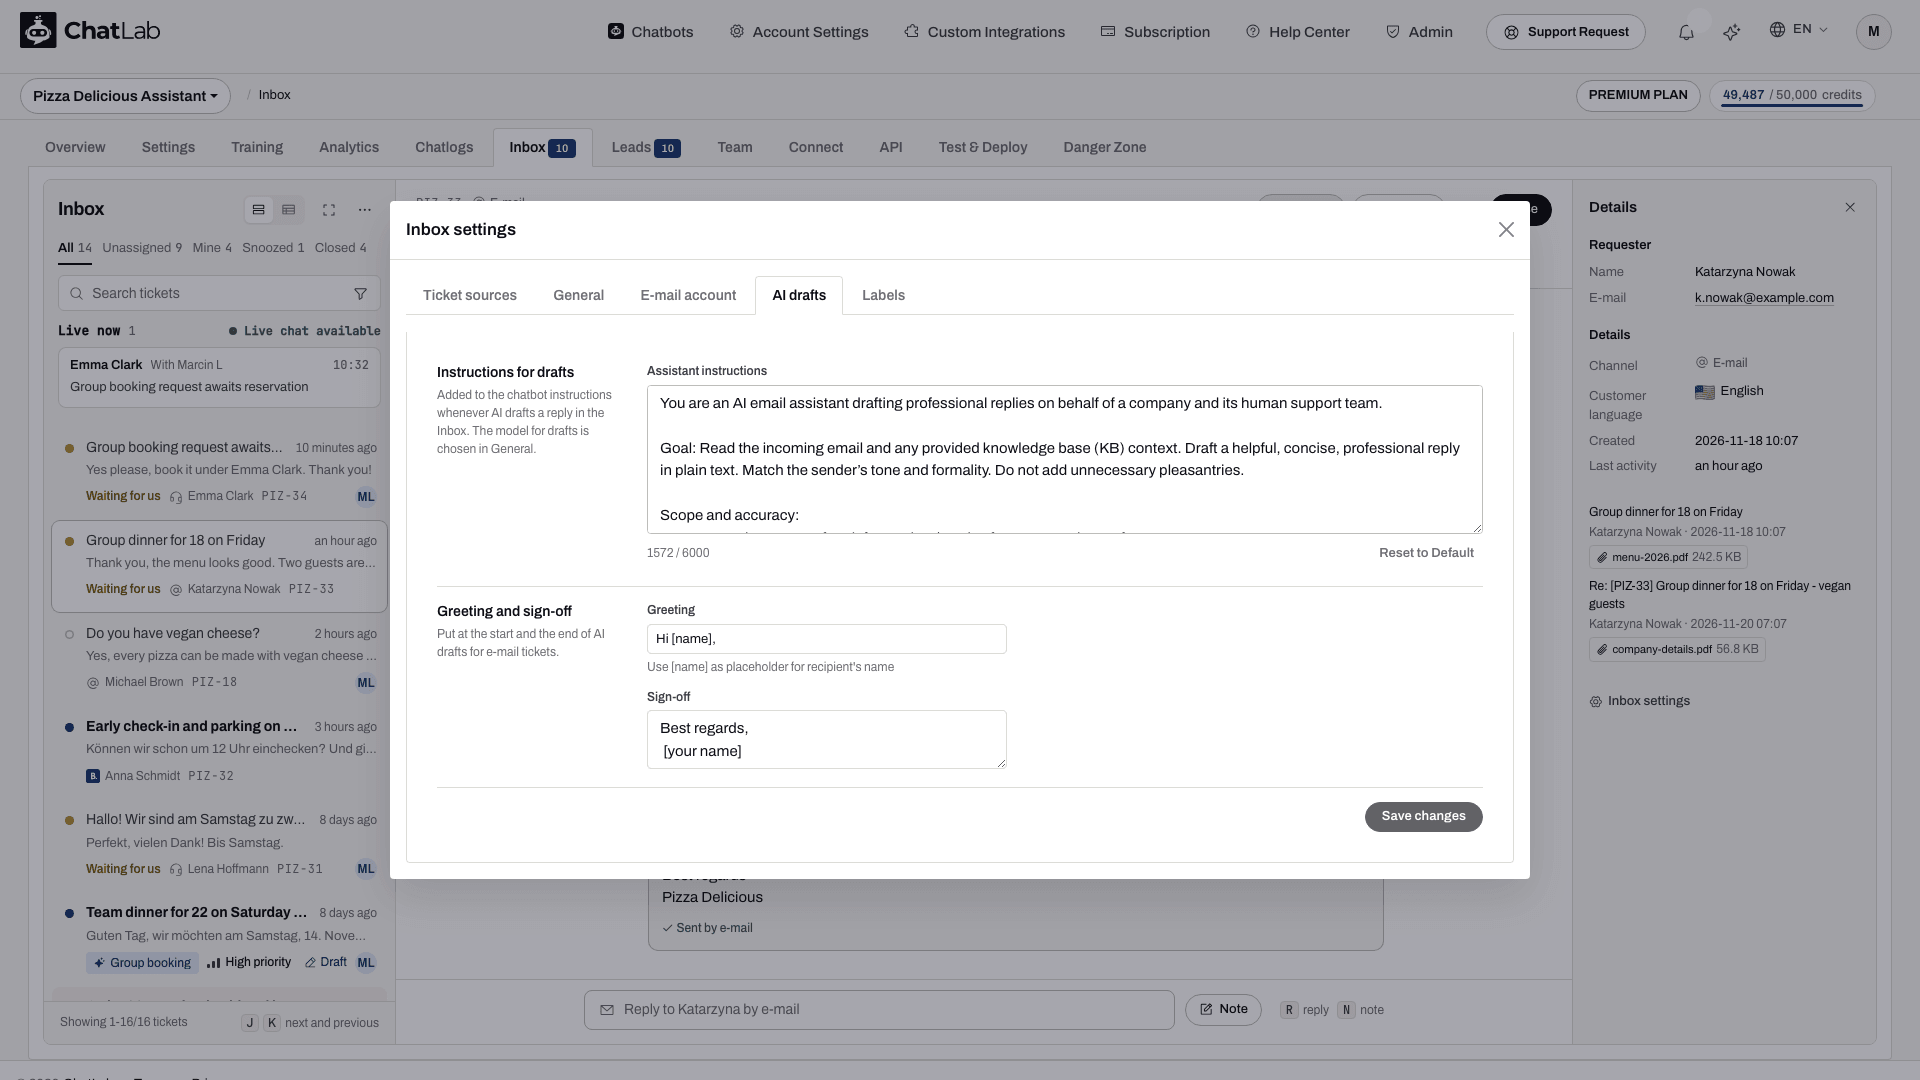
AI drafts - Assistant instructions added to your chatbot's instructions whenever AI drafts a reply (Reset to Default restores the original text), plus the Greeting and Sign-off put at the start and the end of AI drafts for e-mail tickets. Use [name] in the greeting for the recipient's name. These are stored with the connected mailbox, so connect one first.
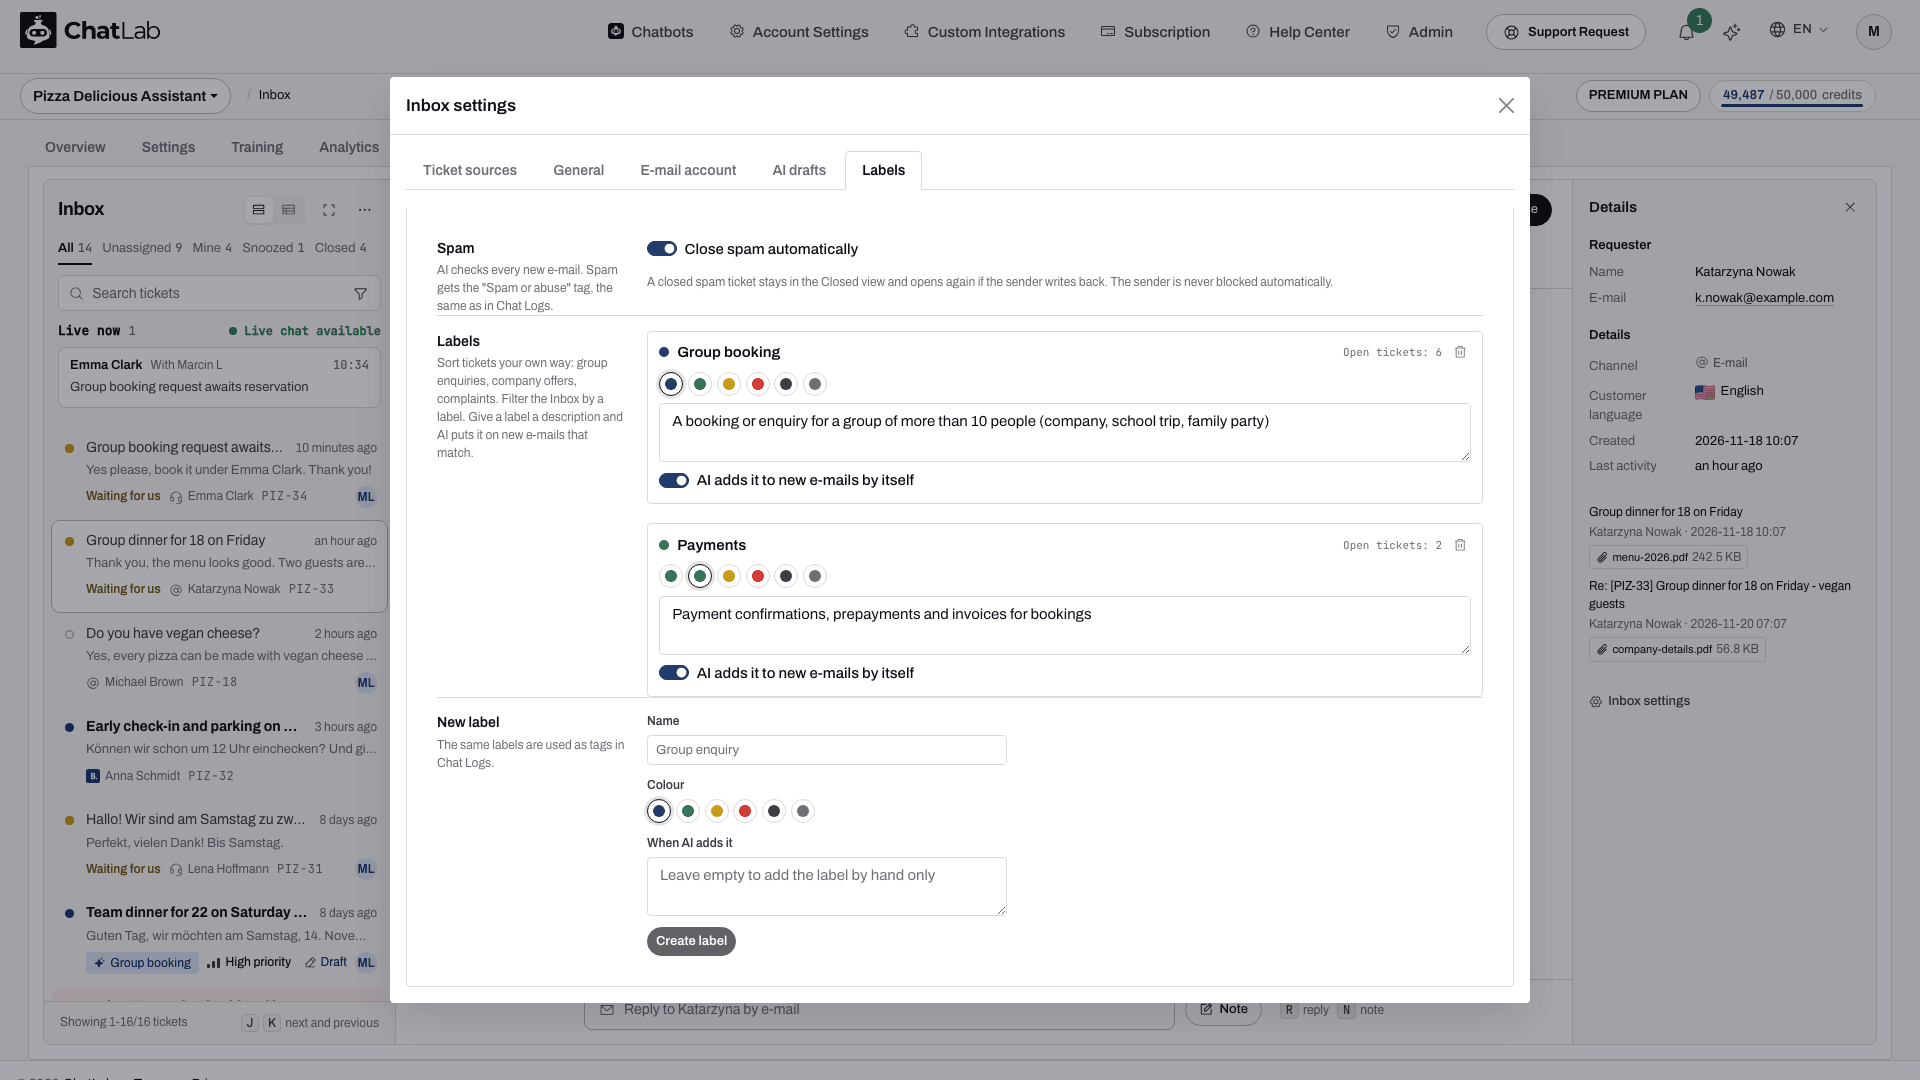
Labels - Close spam automatically: AI checks every new e-mail and gives spam the Spam or abuse tag; with the switch on, such a ticket is closed right away. It stays in the Closed view and opens again if the sender writes back, and the sender is never blocked automatically. Below it you create labels with a name, a colour and an optional description of when AI should add the label, and edit or delete existing ones.
Whether customers can send files in live chat is set separately, in Settings > Live Chat.
Open a ticket for every lead
Leads are easy to collect and easy to forget. Select your chatbot, navigate to Settings > Lead Collection and scroll to the Notification section. The switch Create a ticket in the Inbox for every lead is on by default, so every set of contact details a visitor leaves opens a ticket that somebody has to answer and close.
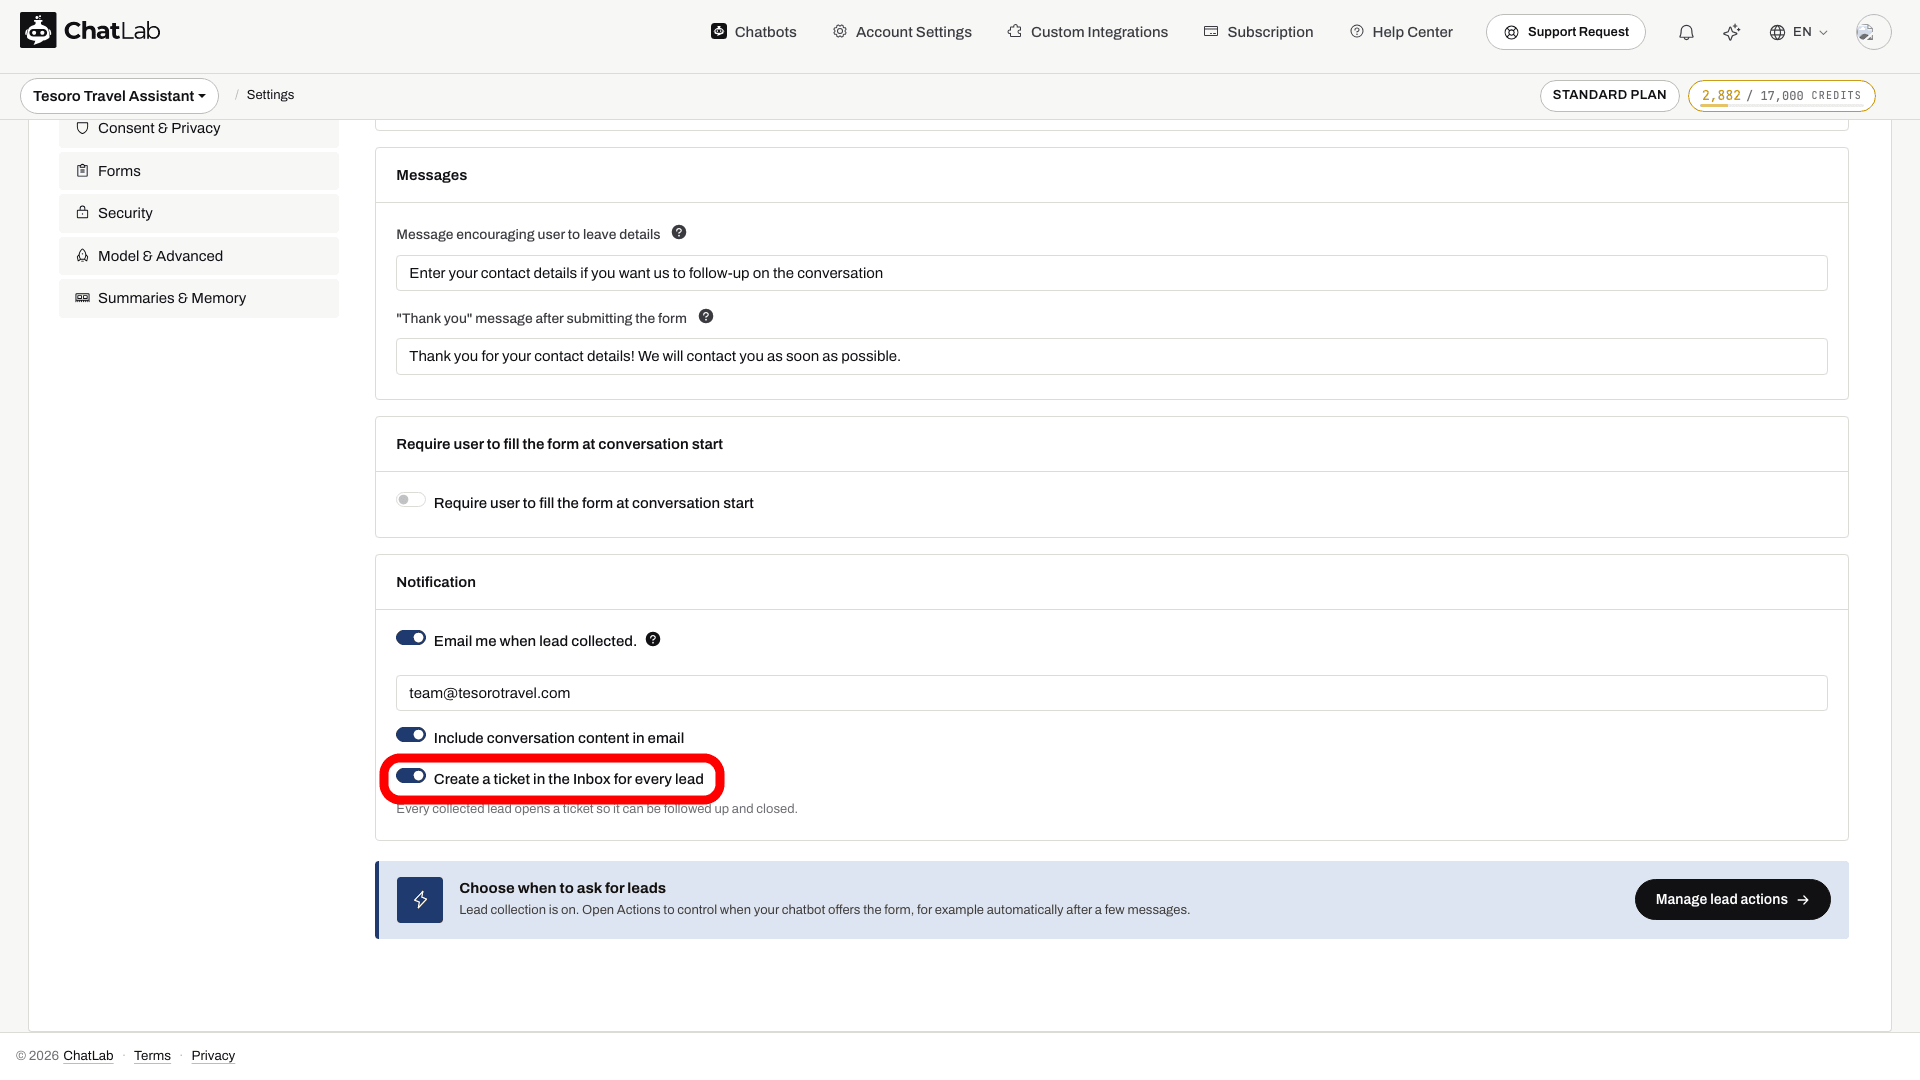
Turn it off if you prefer to work leads only from the Leads tab. See Lead collection.
Notifications
You are notified when a ticket is created, when a customer replies on your ticket, when a ticket is assigned to you and when somebody mentions you in a note. Notifications arrive as a sound and a browser notification, as an unread counter in the browser tab title and on the Inbox tab, in the bell in the top bar, and as a push message if you enabled push.
Notifications are controlled per chatbot in Account Settings > Notifications (in the Inbox and live chat group), under Individual Chatbot Notifications. Each chatbot has its own switch, which covers both live chat alerts and Inbox tickets for that chatbot. Click Save notification preferences after a change. This page and the Operator Profile are available to everyone who has the Inbox, also on plans without live chat.
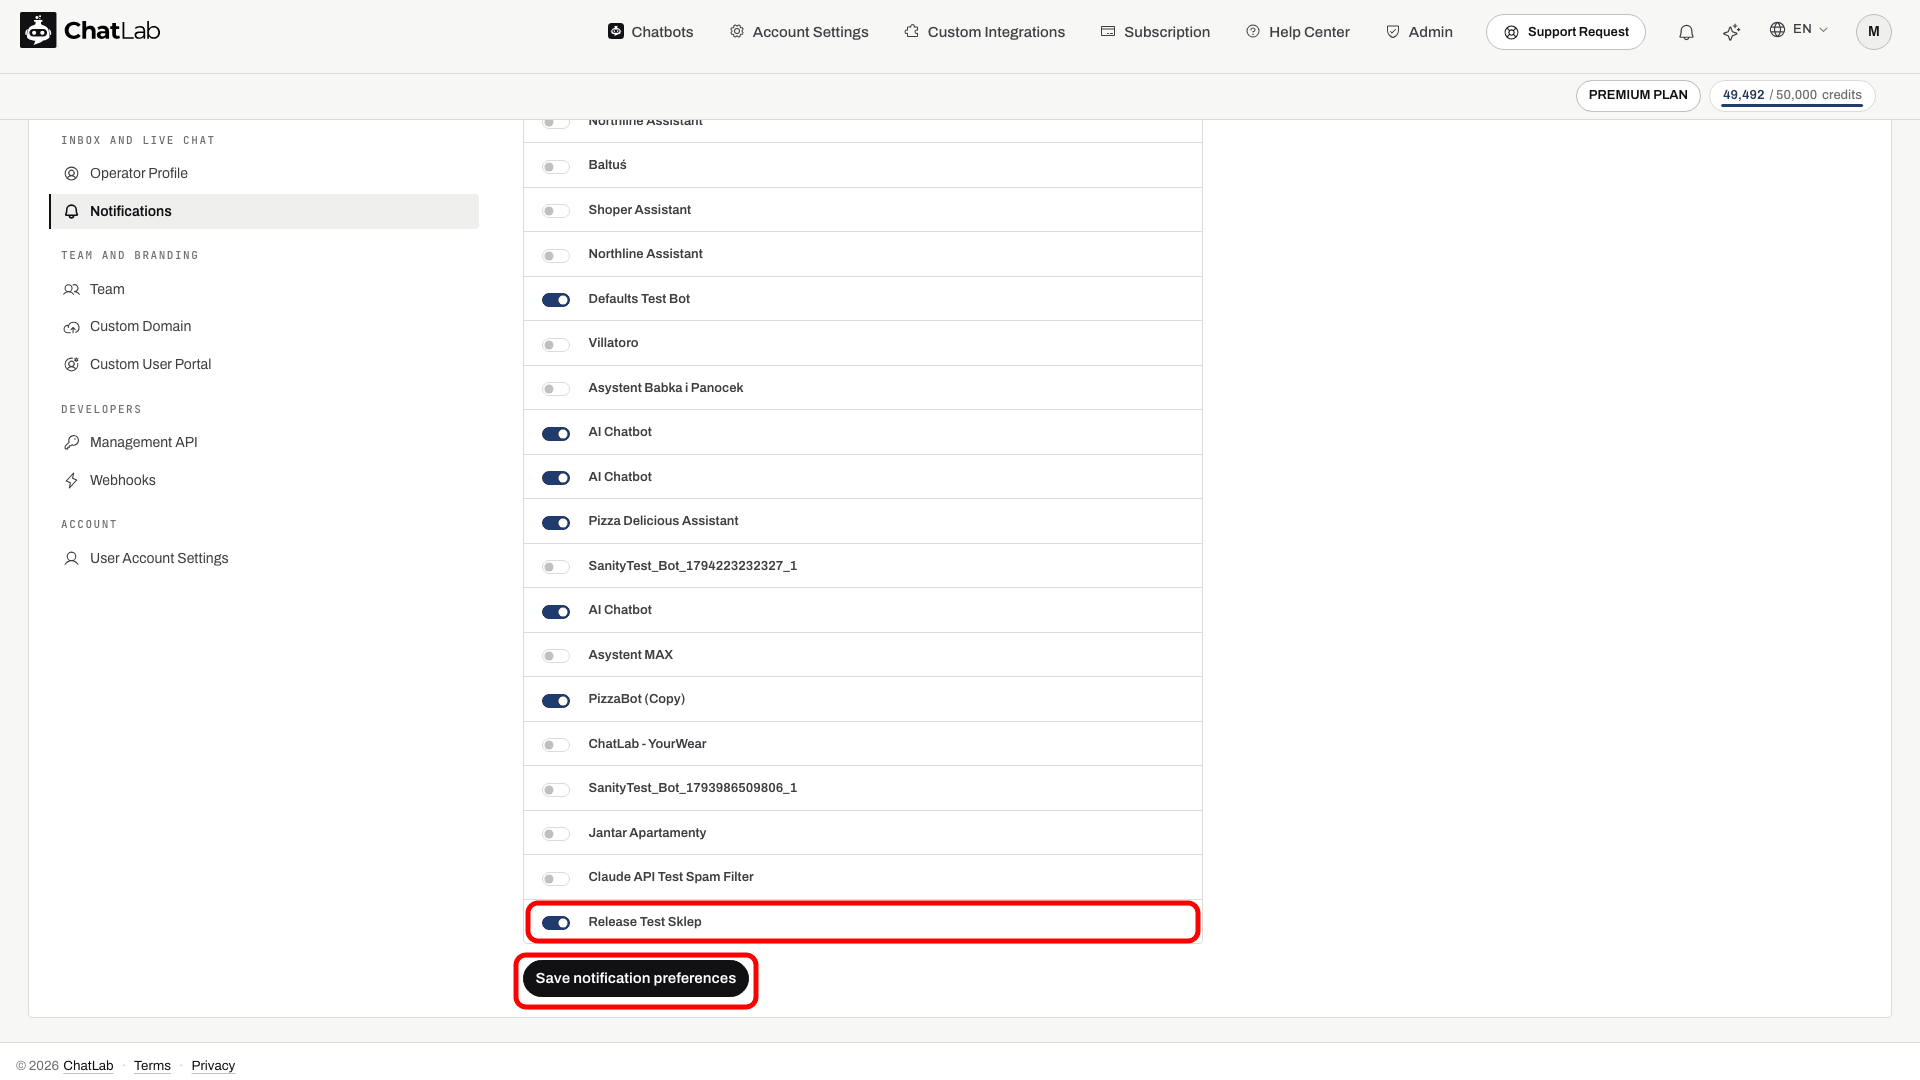
Browser notifications and push are enabled on the same page with Enable browser notifications and Enable push on this device; Live Chat explains both.
Who can work in the Inbox
Teammates you invite under Team on the chatbot, or under Account Settings > Team for the whole account, get one of three access levels:
- Full - everything except billing
- Limited - everything except settings, integrations and the danger zone
- Operator - conversations, Inbox, leads and live chat only, with no access to settings, training, integrations or the mailbox
Operator is the level for people who only answer customers. An invitation can cover all your chatbots or just the ones you select. See Inviting administrators.
Coming from Email Copilot
Email Copilot, the separate mailbox tab with AI reply suggestions, has been replaced by the Inbox. Nothing needs to be set up again. Here is where each part went:
- The connected mailbox is now the Inbox's mailbox, with the same address and settings. Manage it in Inbox settings > E-mail account, or from the E-mail inbox tile in the Connect tab.
- Incoming e-mails become tickets in the Inbox, with status, assignee, internal notes and search, instead of a list of messages.
- Replies go out from the connected mailbox as before, from the reply box of the ticket, in the same e-mail thread.
- AI suggestions are now AI drafts: Draft reply in the reply box, plus Improve and translation. Your Copilot instructions, greeting and sign-off are on the AI drafts tab of Inbox settings.
- Old Copilot links open the Inbox.
- Stored e-mails: e-mails that are part of a ticket stay with the ticket. E-mails that never became a ticket are still deleted after the retention period set in Danger Zone.
- Unsent Copilot drafts were not carried over. If you had a reply in progress, write it again on the ticket.
Related articles
- Managing incoming live chat conversations - answering live chats from the Inbox
- Live Chat - enabling live chat, and what happens when nobody joins
- Chatlogs - the conversation history tickets link back to
- Conversation tags - tags on conversations and the tickets they open
- Human Support Contact Form - the form whose submissions open tickets
- Lead collection - collecting contact details in the chat
- Inviting administrators - giving teammates access to the Inbox
- Deleting your data - e-mail retention and other data settings
- What is a message credit - what AI drafts and text tools cost